Our update is under the slogan "Teamwork is Dreamwork". How so? See for yourself:
Well, who guessed right? In our last update post in March we’ve already announced this feature. Now it is here: the Group Chat!
However, there happened even more than that since March. We’d like to give you an overview, so you are up to date again.
The wait is over: The group chat
"All or nothing? You’ll have to decide!" No, actually you don’t.
Those who are dissatisfied with the previous chat variations – team chat and direct messages – will be really happy by now. We’ve finally implemented a group chat that allows you to easily and individually add members from your organization. With regard to communication, there are no limits anymore.
How to create a new group chat
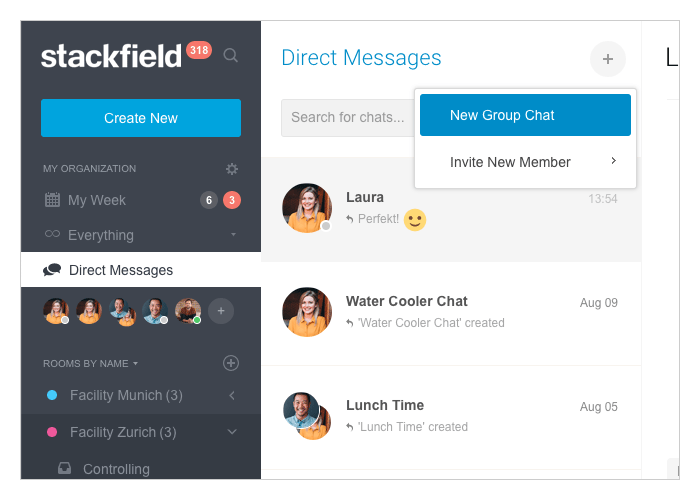
Click on the plus icon within the "Direct Messages" to start a group chat. Within the following drop-down menu, the field "New Group Chat" appears, which leads to a mask for creating the group. Here you can define the group name and then ("Next") members can be added by entering the name or the e-mail address. The "Browse" field opens an overview with all organization members, in which the corresponding people can be searched for and selected. Finally, the entries must be confirmed by clicking on "Create New Group Chat".
How to use the group chat
Generally, you can use the group chat just as you use the direct messages. You can send messages and files.
However, quite similar to the rooms you can access the “Settings” by clicking on the symbol with the three dots right next to the tab "Files". Within the first section “General” you will find a group chat password (the counterpart to the room password) as well as a possibility to change the group name and add a group description.
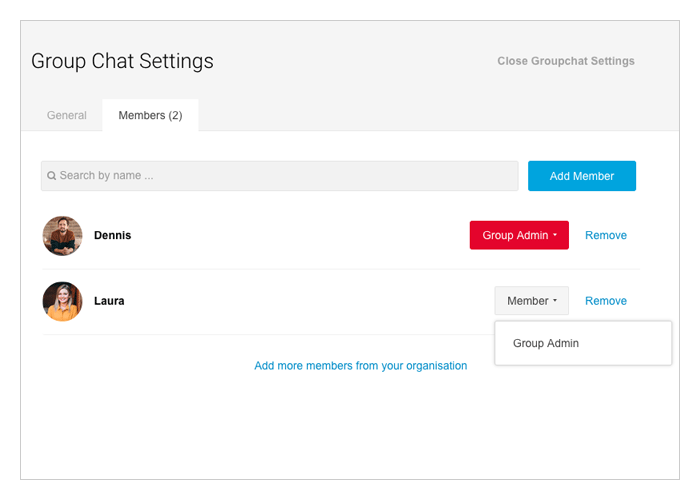
The other section “Members” – which you can also easily call up by clicking on the plus symbol directly within the chat itself – is the place to manage all chat participants. Here you can "add members”, “remove” existing ones and choose whether an existing member should be a group admin or a simple member. However, only group admins have the right to change the settings.
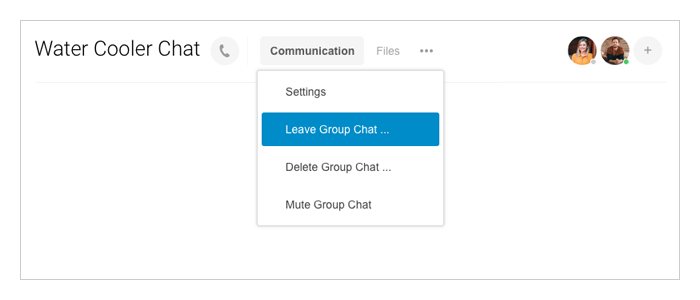
If you want to leave the group chat, you can do so via the symbol with the three points choosing the option "Leave Conversation ...".
'My Week' aka 'The New Dashboard'
The dashboard is now called “My Week”. But not only the name, also the functionality has changed.
The weekly summary provides an overview of current notifications and all upcoming tasks, appointments, and events. Until recently, a comprehensive overview of your own user account was available, but the organizational overview was limited to the essential components: a numerical breakdown of all tasks according to their processing status with personal reference.
More detailed views of individual team members
For teamwork, however, it is also very helpful to have a detailed overview of the tasks of the people with whom you work closely. Therefore, it is also easy to switch between the views of individual team members.
To do so, click on the user selection and then on “+ Manage Members”. Now the window “Organization Members” opens, in which individual members can be added to your selection.
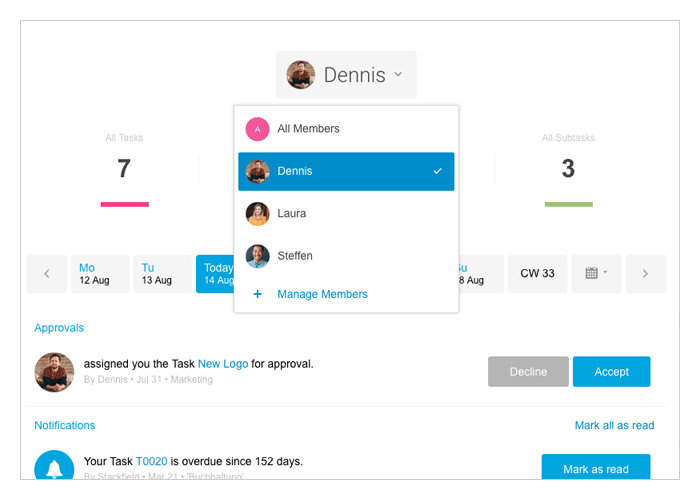
All selected members (including all tasks according to their processing status) are now also being displayed in the details within the “All Members” view (“Show Details”).
In addition, the week of each newly added member can now be represented due to the respective user selection. By then you'll see an accurate view of all the tasks, overdue tasks, and overdue subtasks of the chosen user that is similar to your own weekly view.
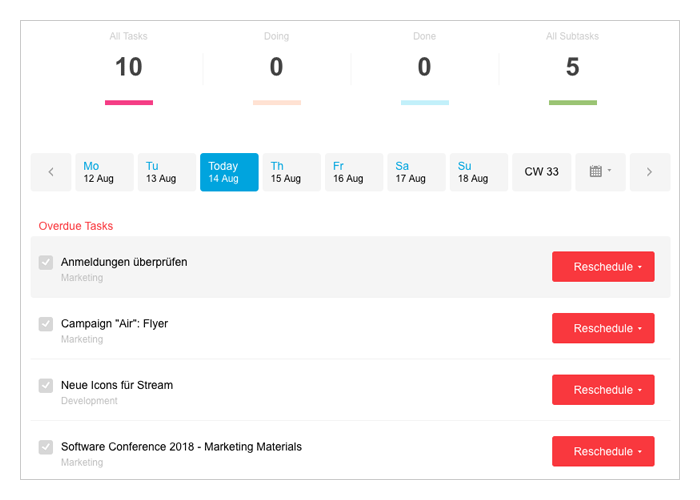
Are you waiting for feedback/the completion of a task, or do you want to know if your team member needs help because of too many overdue tasks? After having a brief look at the week of your colleague you will know.
Note: Of course, you only see content from the rooms you belong to and no personal notifications.
Filters for the team chat stream
Additionally, we provided a better overview within the communication module of the individual rooms. Filtering options for the new stream can easily hide content that is currently of no interest to you.
To do this, click on the arrow symbol in the “Communication” tab and select all content you want to display. You can choose from the filters “Chat Messages” (which always applies no matter what else you chose), “Comments”, “Subscribed Elements”, “Changed Elements” and “System Messages”.
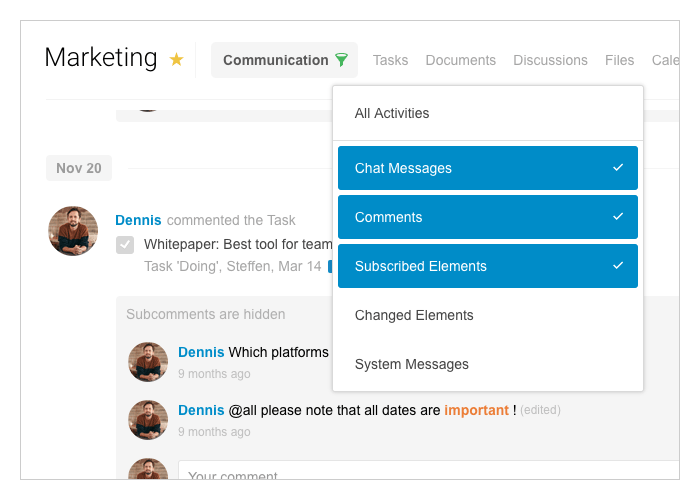
The green filter icon (when shown instead of the arrow symbol) indicates that a filter is active. If you want to deactivate the filter you can do so simply by choosing the filter option “All Activities”.
New Style: Our Cat has been mischievous for the last time
Maybe you also noticed some new features in the design of our tool. We decided to give Stackfield a new look, too. Our cat and other characters who have been with us for a long time had to give way to new chic graphics. In addition, the display of the files has been enhanced with illustrative icons.
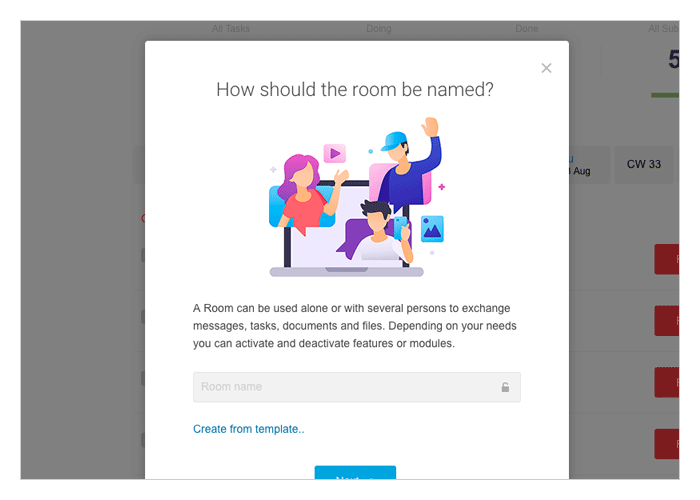
As you can see, we try to make it easier for you and your team to work together as best as we can. More updates will follow, because only Teamwork is Dreamwork!
Almost finished...Please click the link in the email and confirm your email adress to complete the subscription process.
Never miss a post. Get awesome insights in your inbox.