The year of 2024 is coming to an end and we have prepared a bunch of exciting updates for you once again! The new templates for tasks and subtask lists save you time when organizing recurring tasks. A revised navigation bar in the room is going to make module management easier than ever. Text messages can now be formatted in numerous ways in the chats and comments. And these are just some of the many new features that are waiting for you on Stackfield. Look forward to the biggest update of the last few years and discover how you can best apply the new features in your everyday life.
Templates for tasks and subtask lists
Whether it's training new team members or preparing weekly meetings – many processes remain constant and can be standardized. This is exactly where Stackfield comes in handy. With the new templates for tasks and subtask lists, you save valuable time and can fully rely on Stackfield as your ‘external brain‘. Organize routine processes more efficiently and allow yourself to focus on the really important things.
How to create a task template
To create a task template, first click on the blue plus button at the top right of the task module as usual and select the New task
option.
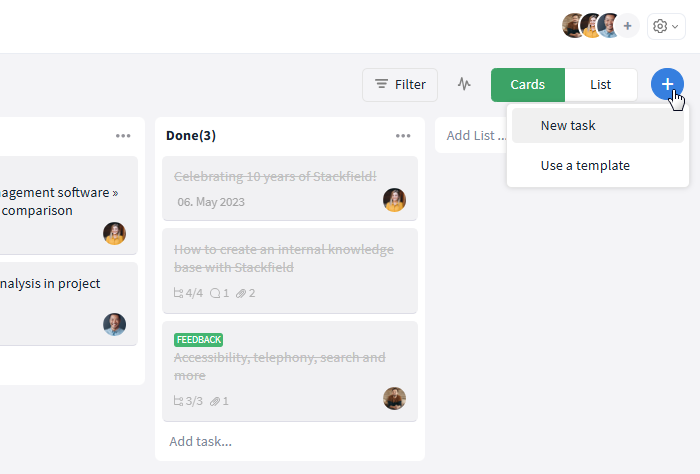
You can create new templates via the blue plus button
Inside the task card, you can now enter all the information you want to include in the template, such as title, description, assignment and subtasks. Next click on the More button (symbol: three dots) at the top right, select the “Template” option and click on “Save as new template”.
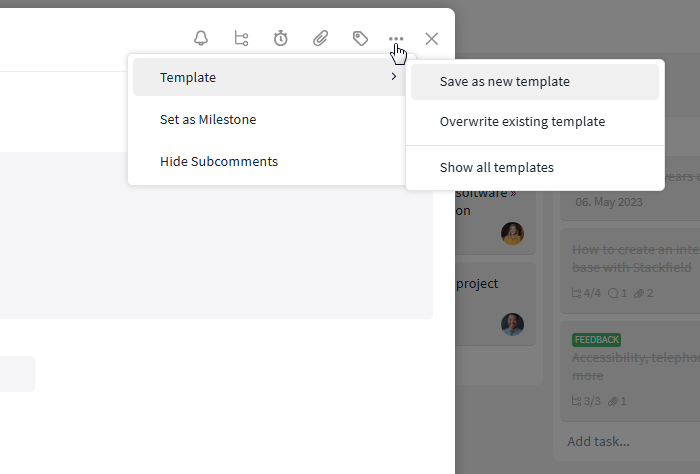
Save a new template via the More button
Finally, you can add a description in which you briefly define the purpose of the template. Click on “Save Template” to add the template to the room.
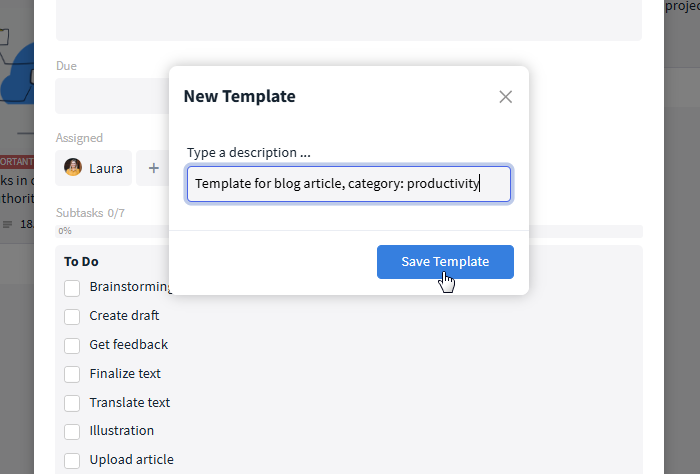
Add a description to your template
How to use a task template
To create a task from a template, click on the blue plus button at the top right of the task module and select the “Use a template” option.
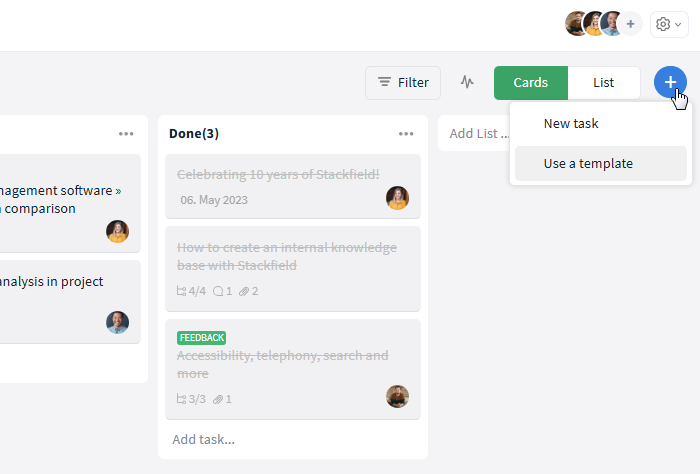
Create a task from a template
You will now see an overview of all the task templates created in the room. To select a template, click on the corresponding box.
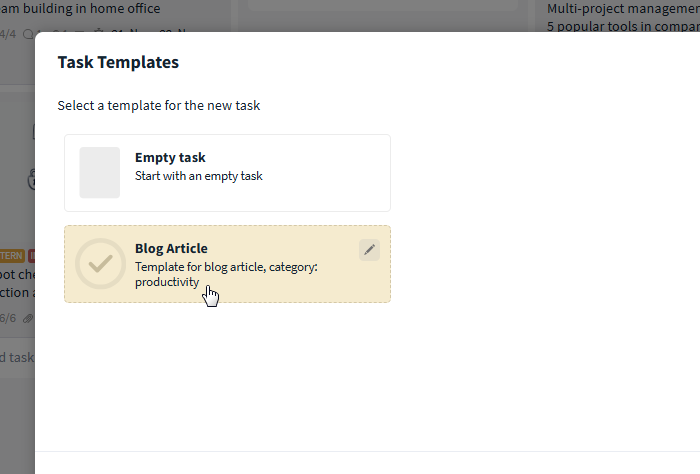
Select a template
Next, a task card will open containing all the information from the template. Further fill in the task as needed and click on “Save Changes” to create the task.
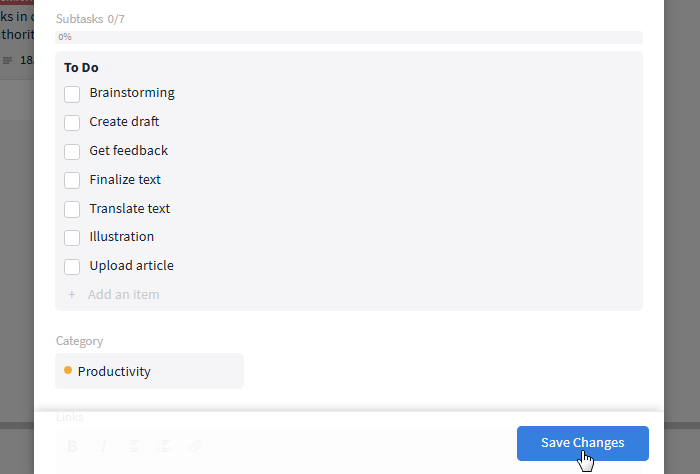
Save the new task
How to edit an existing task template
To edit a task template, click on the blue plus button and select the “Use a template” option.
Next, move the mouse over the relevant template and click on the pencil icon that appears in the top right-hand corner.
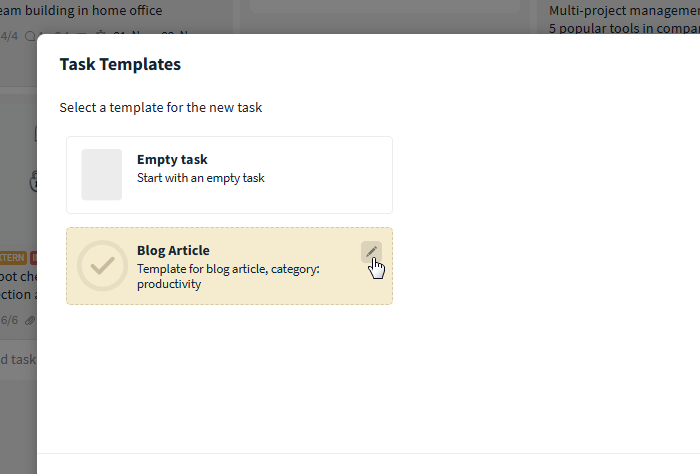
You can edit templates via the pencil icon
You can now modify all the information in the task card as required. Finally, save the edited template via “Save Changes”.
How to create a template for subtask lists
To create a subtask list template, first click on the blue plus button and select the “New task” option or open an existing task. Then click on the subtask icon (“Subtasks” on mouseover) at the top right and select “New subtask list”.
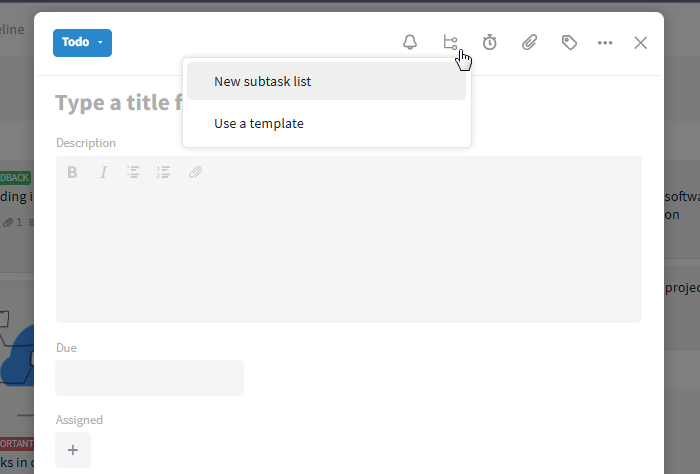
To create a new template, create a new subtask list
Enter a title for the list as usual, click on “Add” and then add all subtasks that should be included in the template. Add assignments and descriptions as required.
Once you have entered all the relevant information, move your mouse over the title of the subtask list and click on the More button that appears on the right-hand side (symbol: three dots). Now select “Save as new template”. Finally, you can add a description in which you briefly define the purpose of the template. Click on “Save template” to add the template to the room.
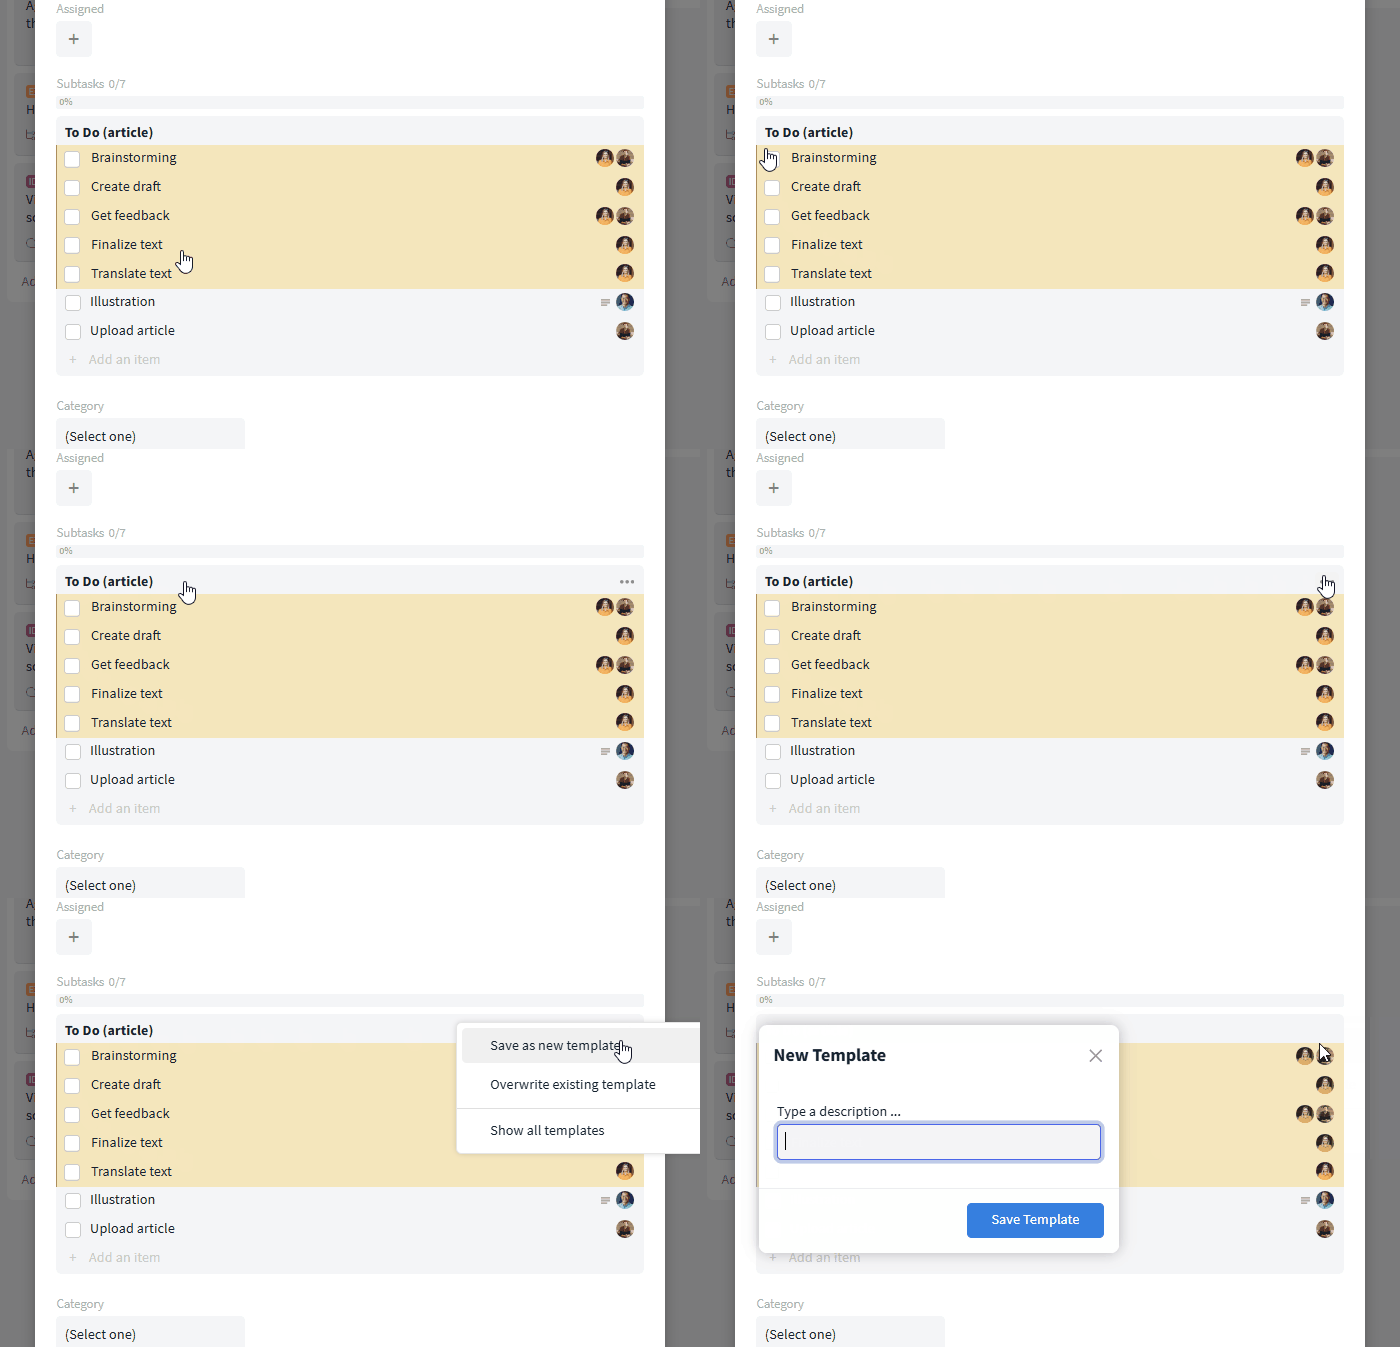
You can save the template via the More button
How to use a subtask list template
To create a subtask list from a template, first open the task that is to contain the relevant subtasks. Then click on the subtask icon (“Subtasks” on mouseover“) in the top right-hand corner of the task card and select the option ”Use a template”.
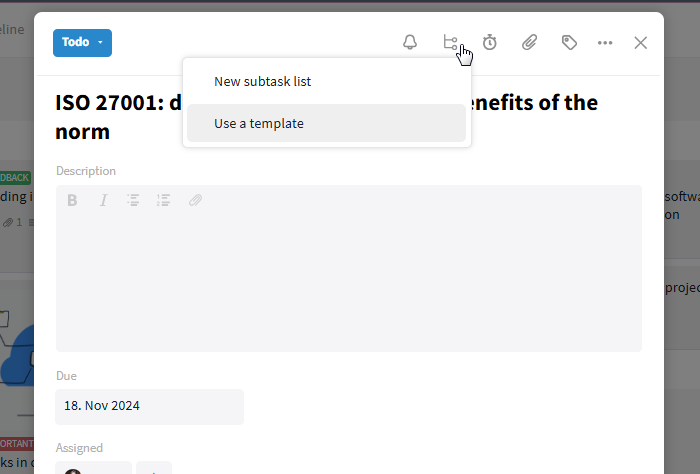
You can create a subtask list from a template
All existing templates for subtasks are now displayed in an overview. To select a template, click on the corresponding box.
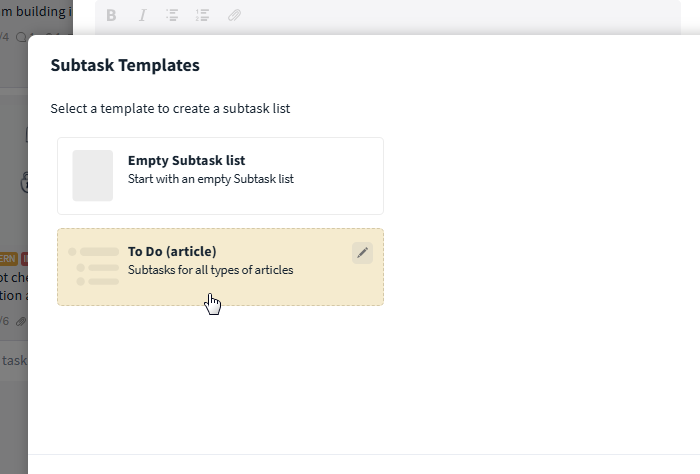
Select a template
The list is now added to the task. Expand or edit it as required.
How to edit an existing template for subtask lists
First open a task, click on the subtask icon (“Subtasks” on mouseover) at the top right and select the option “Use a template”.
Now move the mouse over the template you want to edit and click on the pencil icon that appears in the top right-hand corner.
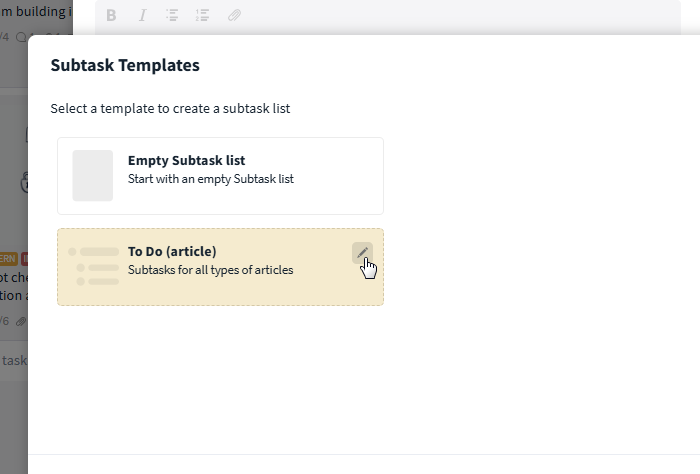
You can edit templates via the pencil icon
The list will now open and you can edit it accordingly. Finally, click on “Save Changes”.
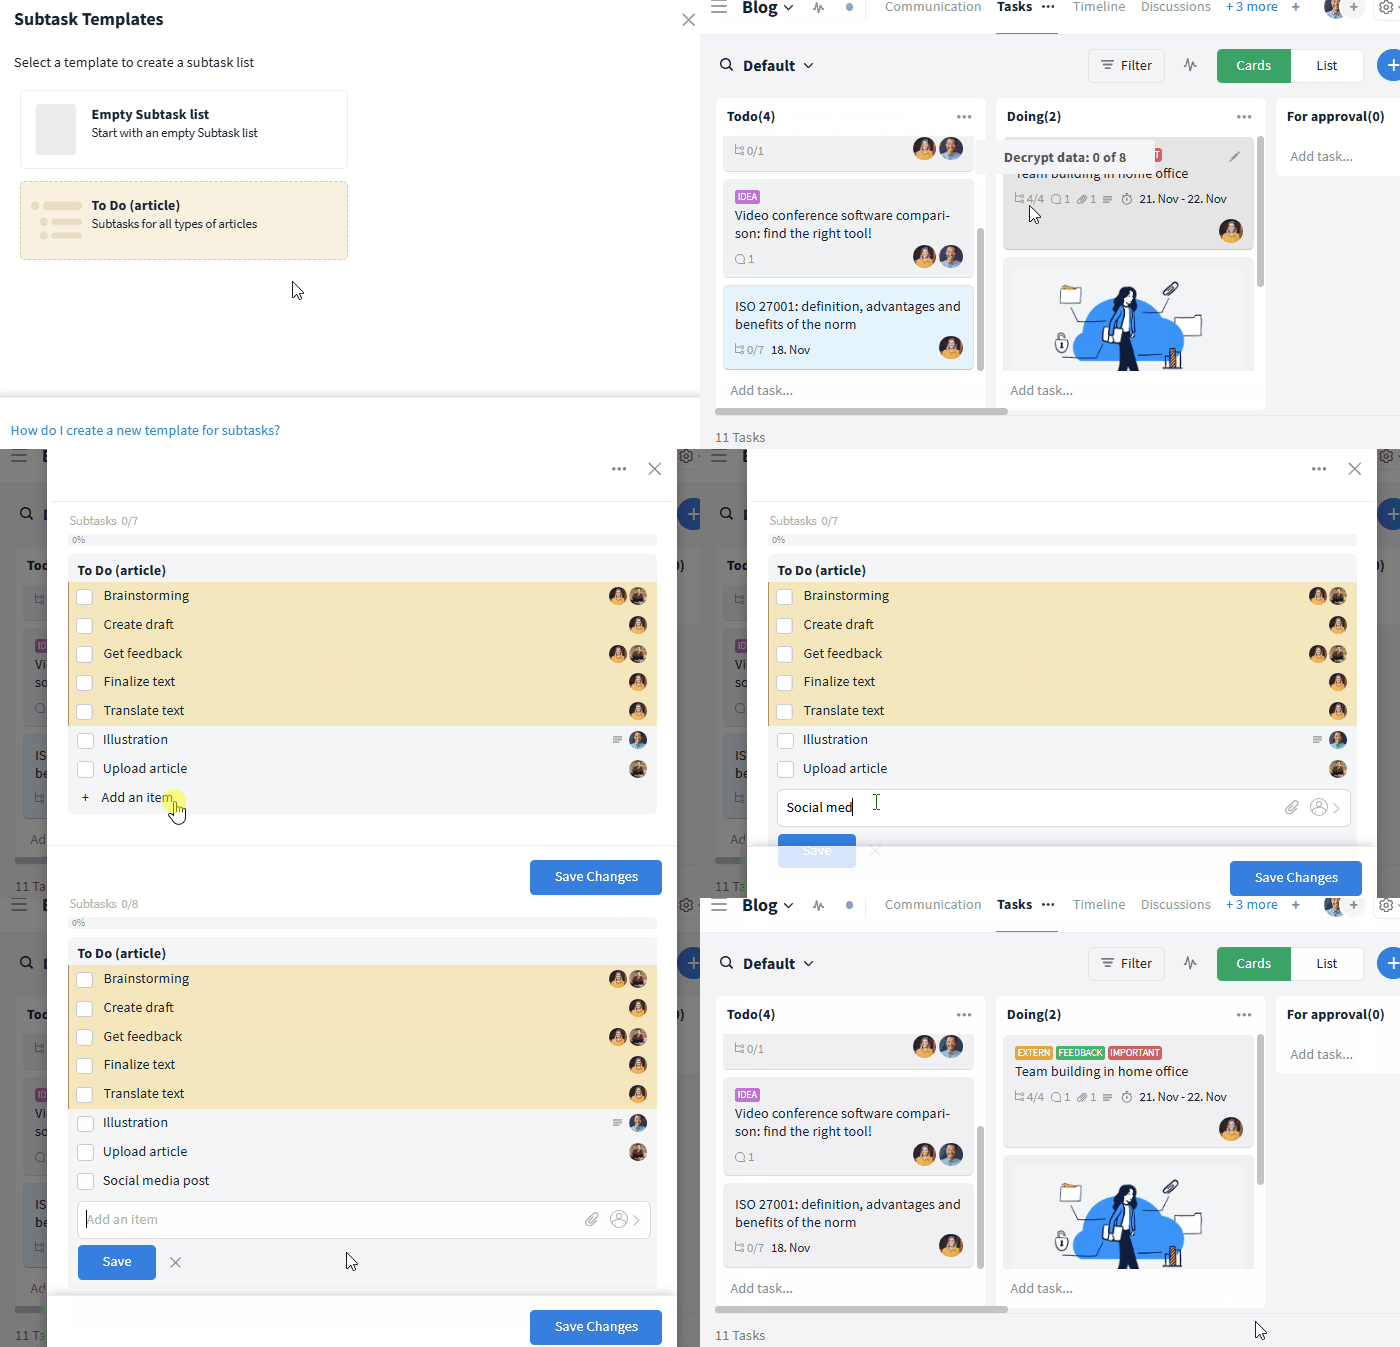
Don't forget to save your changes
New navigation bar in the room
In Stackfield, the actual work mainly takes place in rooms. The various modules take center stage. To make it easier for you to manage the modules and find your way around the navigation bar, we have redesigned the top bar in the room and added some useful features. This makes navigation in the room even more intuitive and efficient.
Latest Activities
To the right of the room name in the top left-hand corner, you will now find the activities icon instead of the favorites icon.
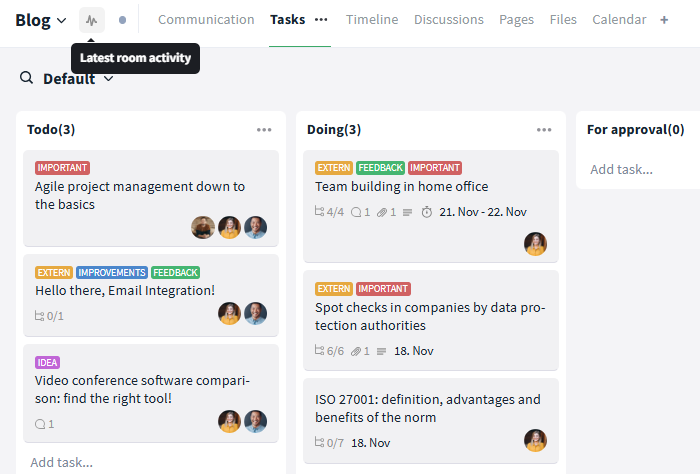
Check the latest activities in the room
By clicking on the icon, you can view all of the room's latest activities, be it changes to elements or chat messages. But don't worry: you can still favorite the room by clicking on the room name and using the “Add to Favorites” option.
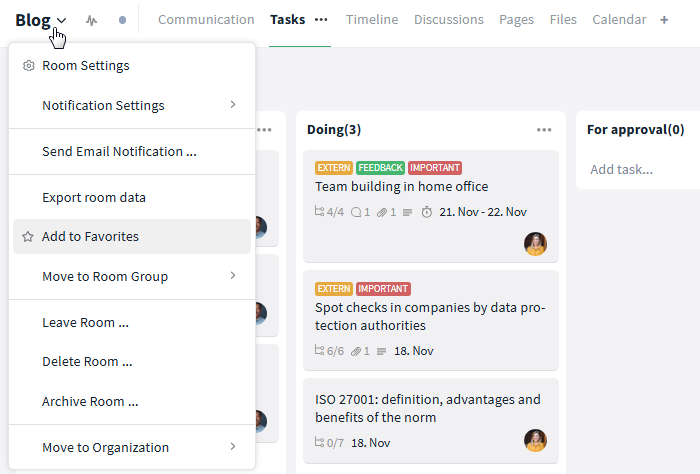
You can pin rooms as favorites to the top of your sidebar
More button for modules
As before, you can switch back and forth between the different modules in the sidebar at the top. The module you are currently in is highlighted in bold. To the right of the name, we have now added a More button (symbol: three dots). Click on the button to display a list of actions.
1. Renaming the module
You can rename the module with just a few clicks using the “Rename” option. Make sure to communicate changes here with your team so that everyone in the room can still find their way around afterwards.
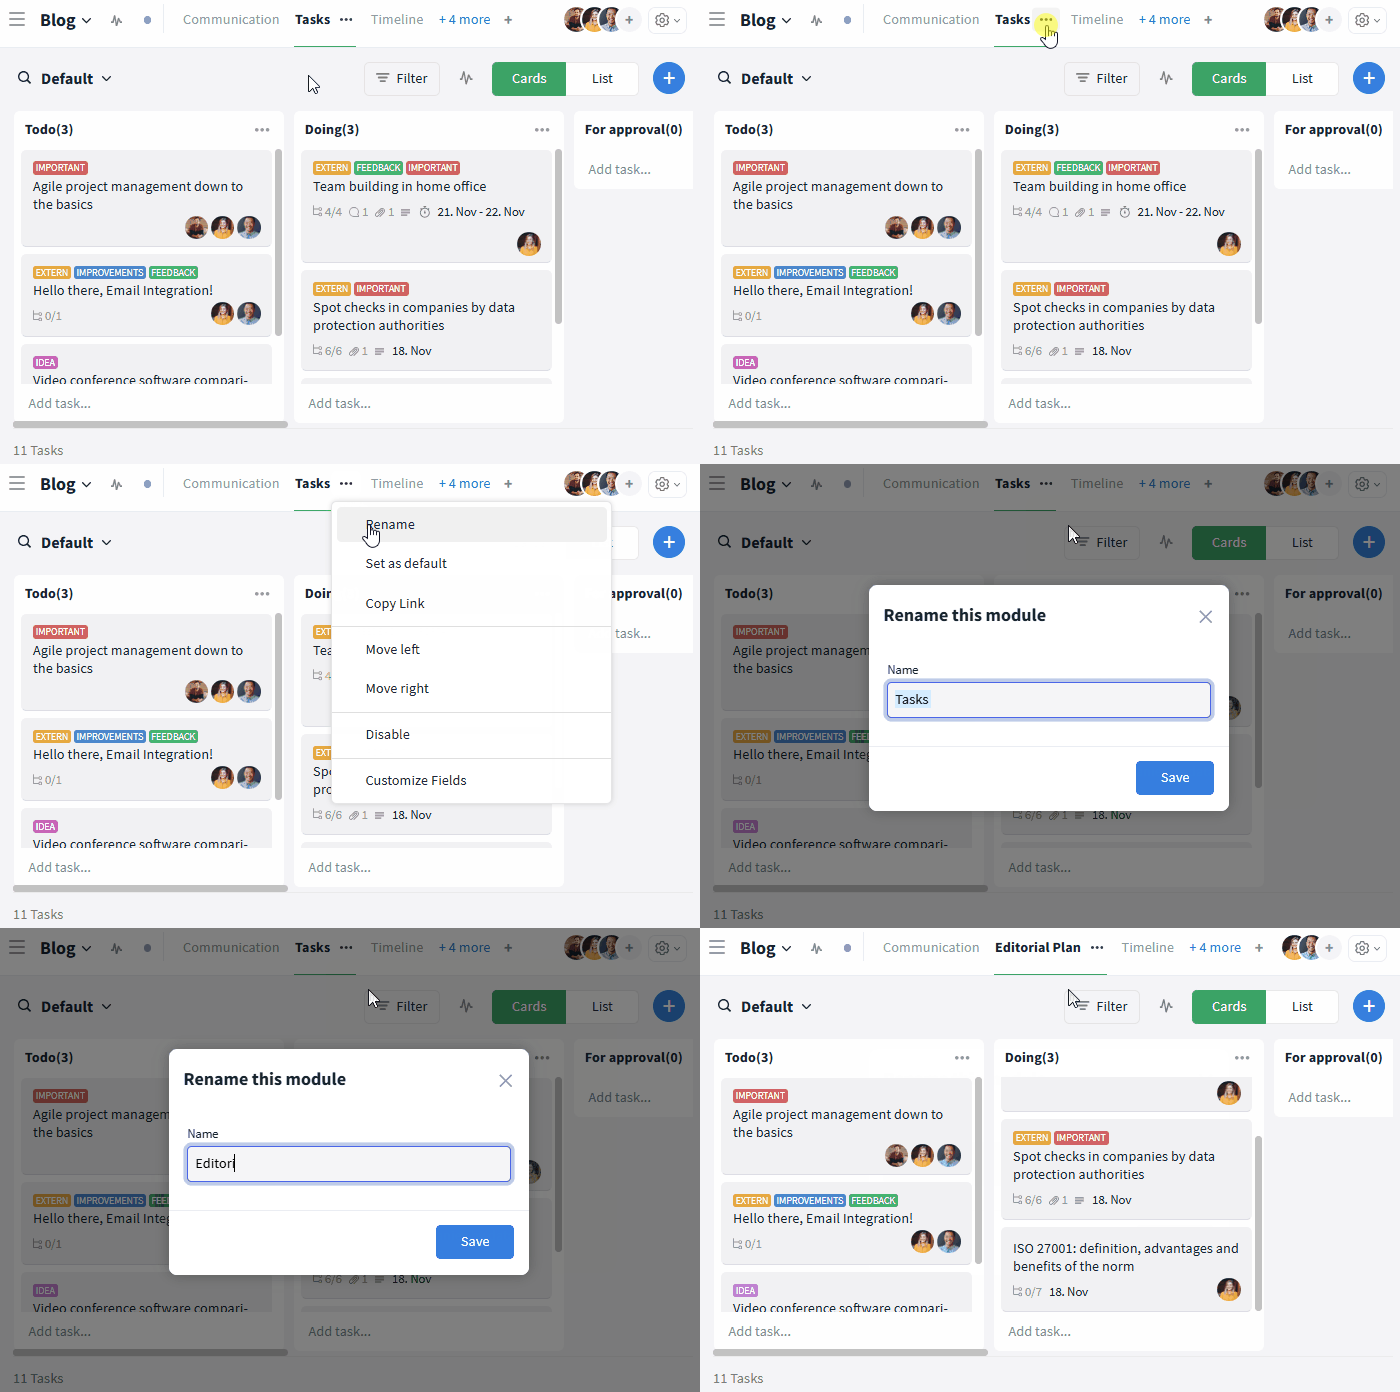
You can rename modules via the More button
2. Selecting a default module
When you open a room, the first module is opened by default, for example the communication module. Alternatively, you can now decide for yourself in which module the room should open for you, e. g. in the task module. The choice is up to each room member. Simply select the option “Set as default” for the respective module. The current default module is marked with a green tick.
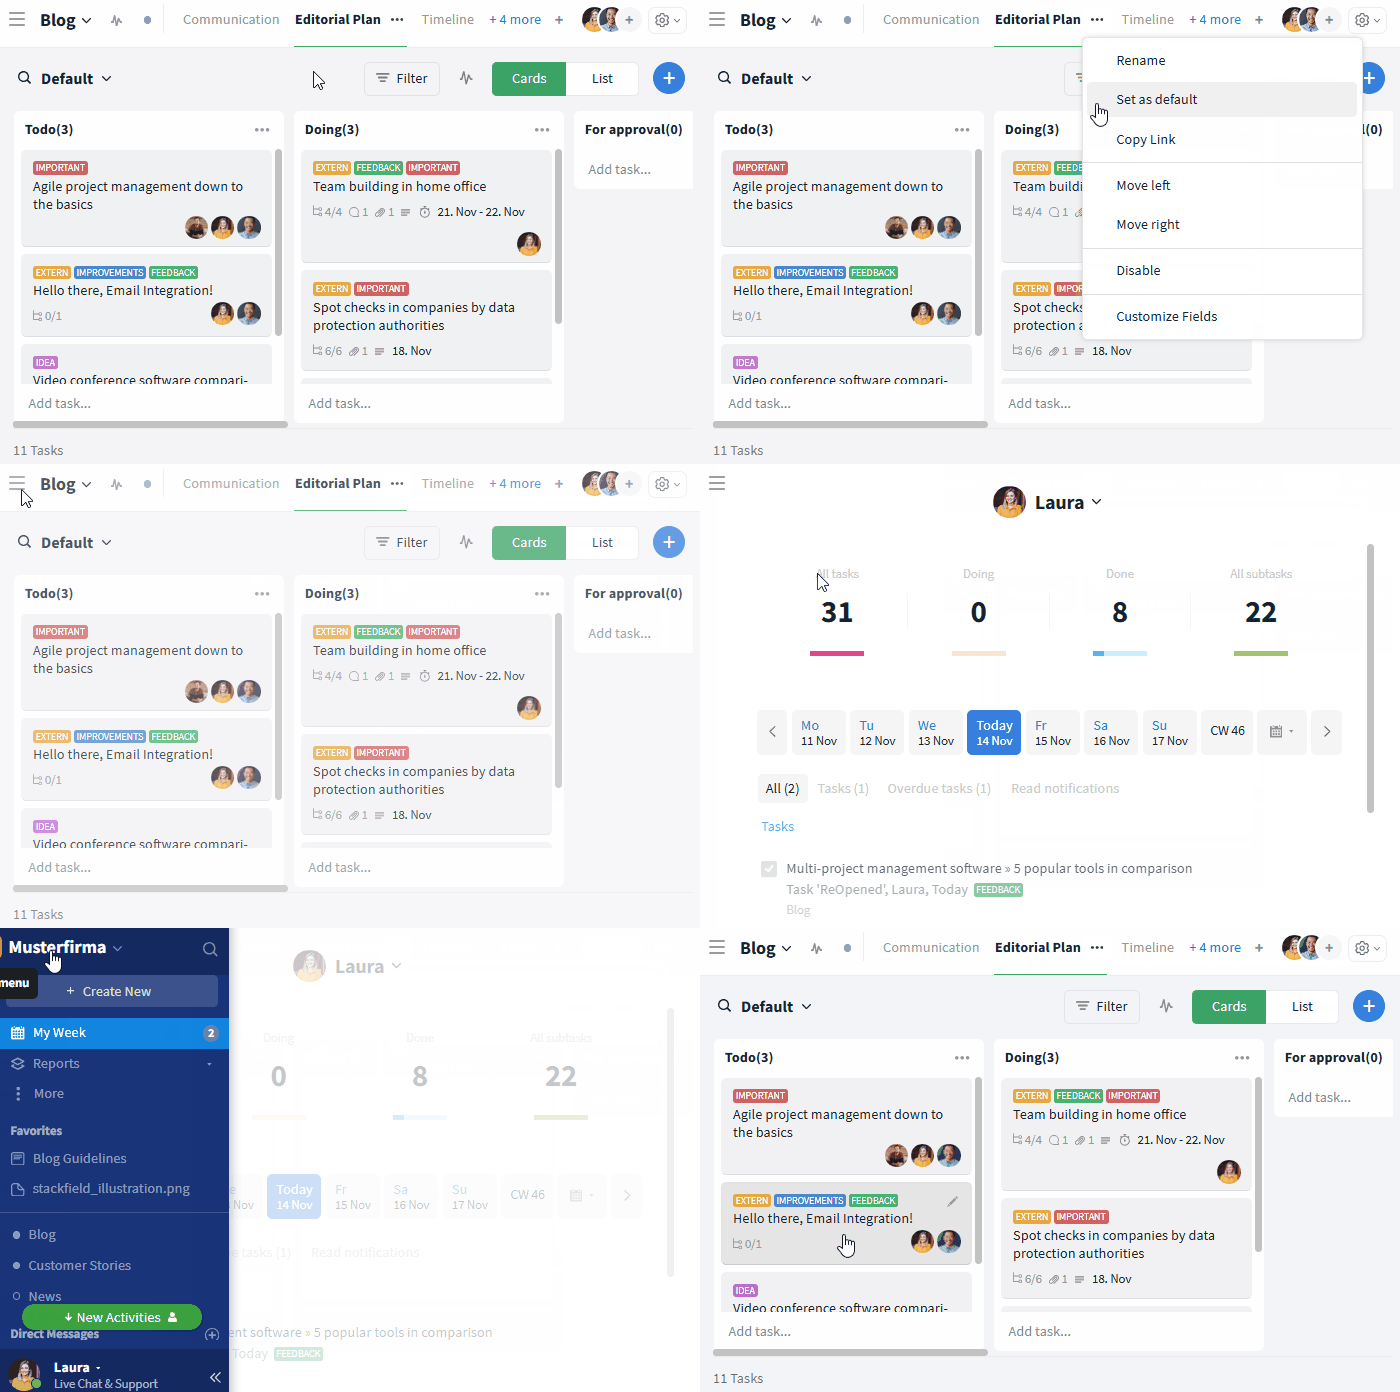
The default module is the first to open when you enter the room
3. Copying the link of a module
You can use the “Copy Link” option to share the module with authorized individuals. Users who open the link and are included in the room are automatically forwarded to the corresponding module.
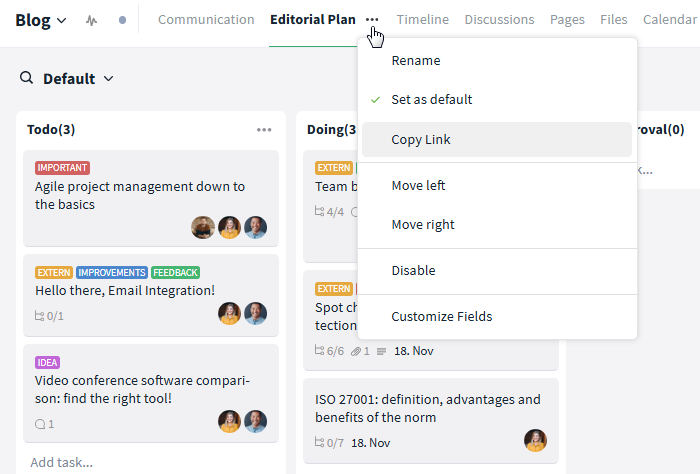
Share the link of a module with other room members
4. Changing the order of the modules
The new highlight in the navigation bar: You can now change the order of the modules using the More button. Simply click on "Move left/right" to change the position of the module. Repeat the process with the desired modules until you are satisfied.
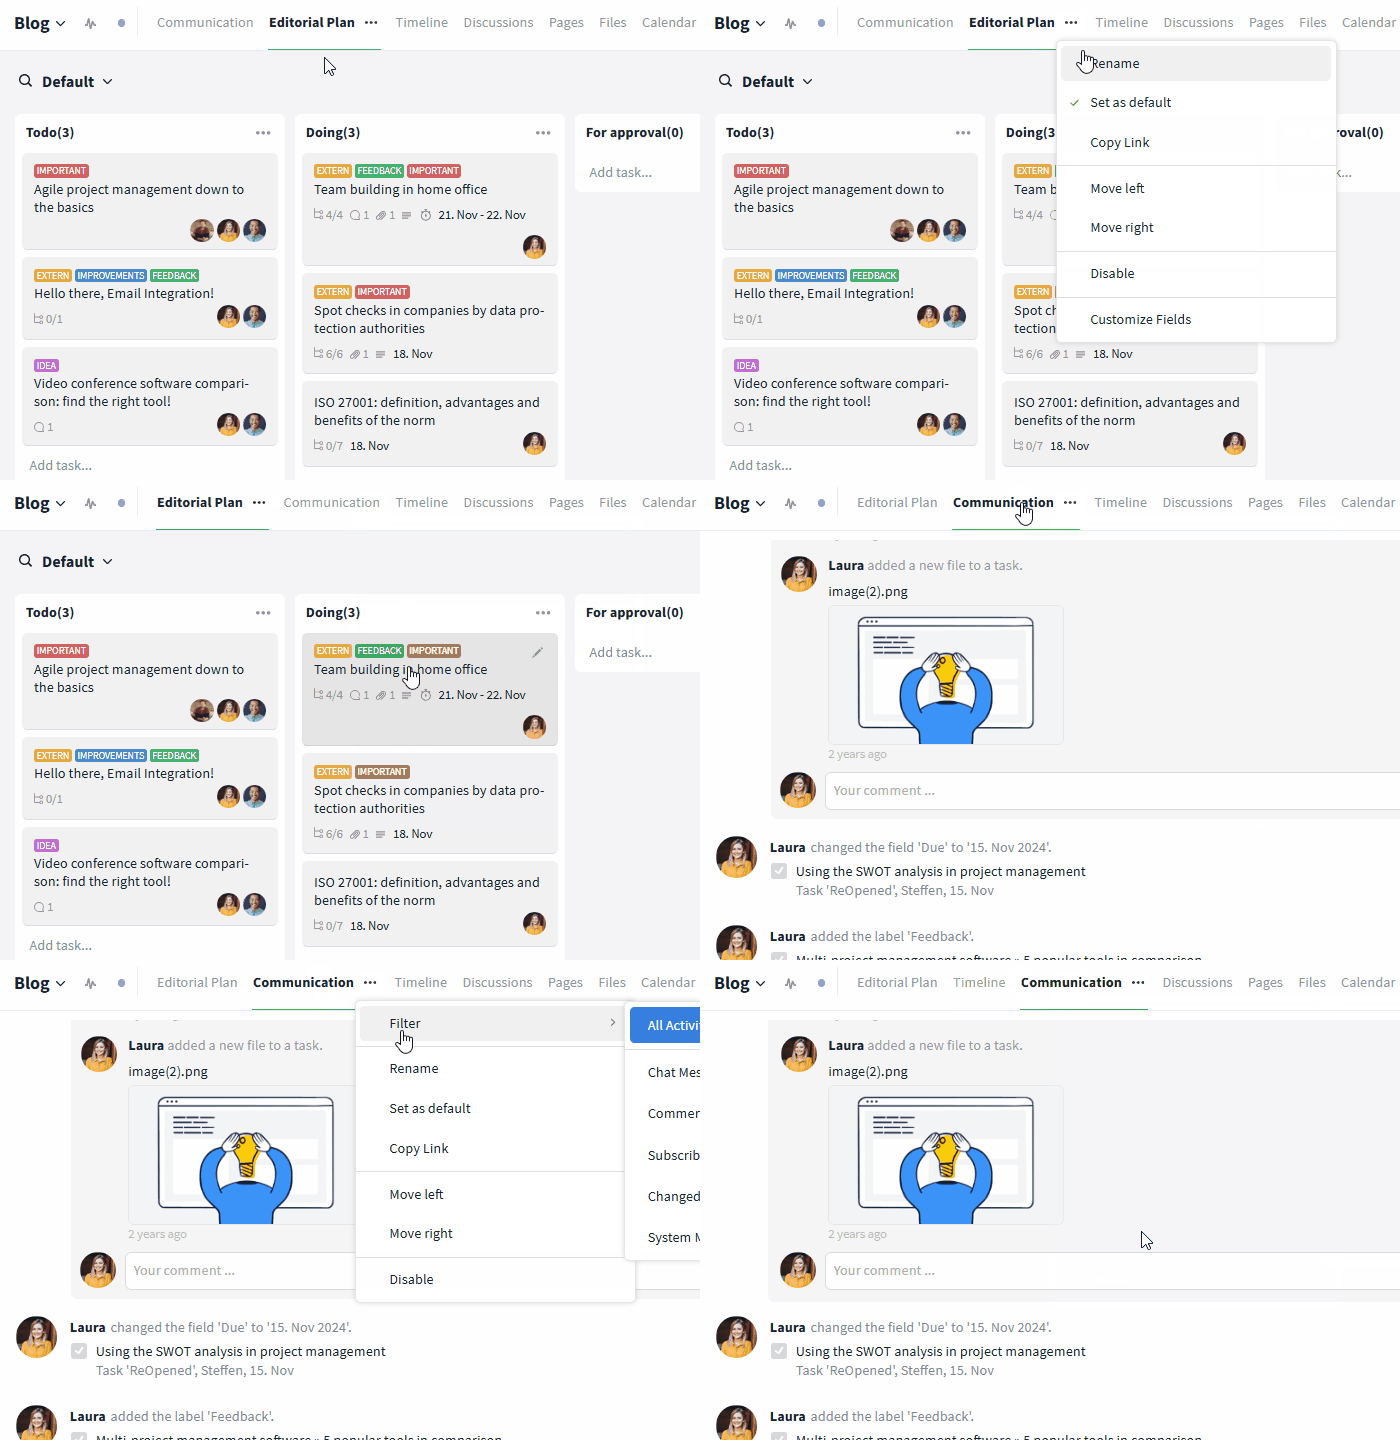
Sort the modules in the room as you wish
5. Disabling a module
Using the “Disable” option, you can disable the corresponding module with just a few clicks and remove it from the overview.
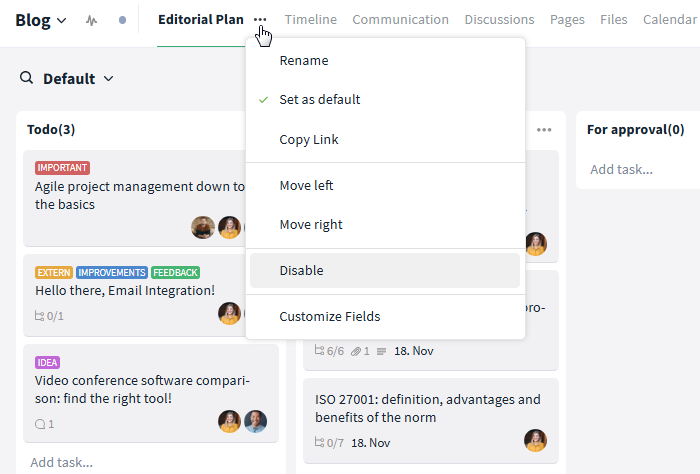
Disabled modules are hidden
Enabling modules
To the right of the modules, you will now find a small plus icon. Click on the plus icon to display a list of all disabled modules. By clicking on a module, you can enable it and add it to the overview.
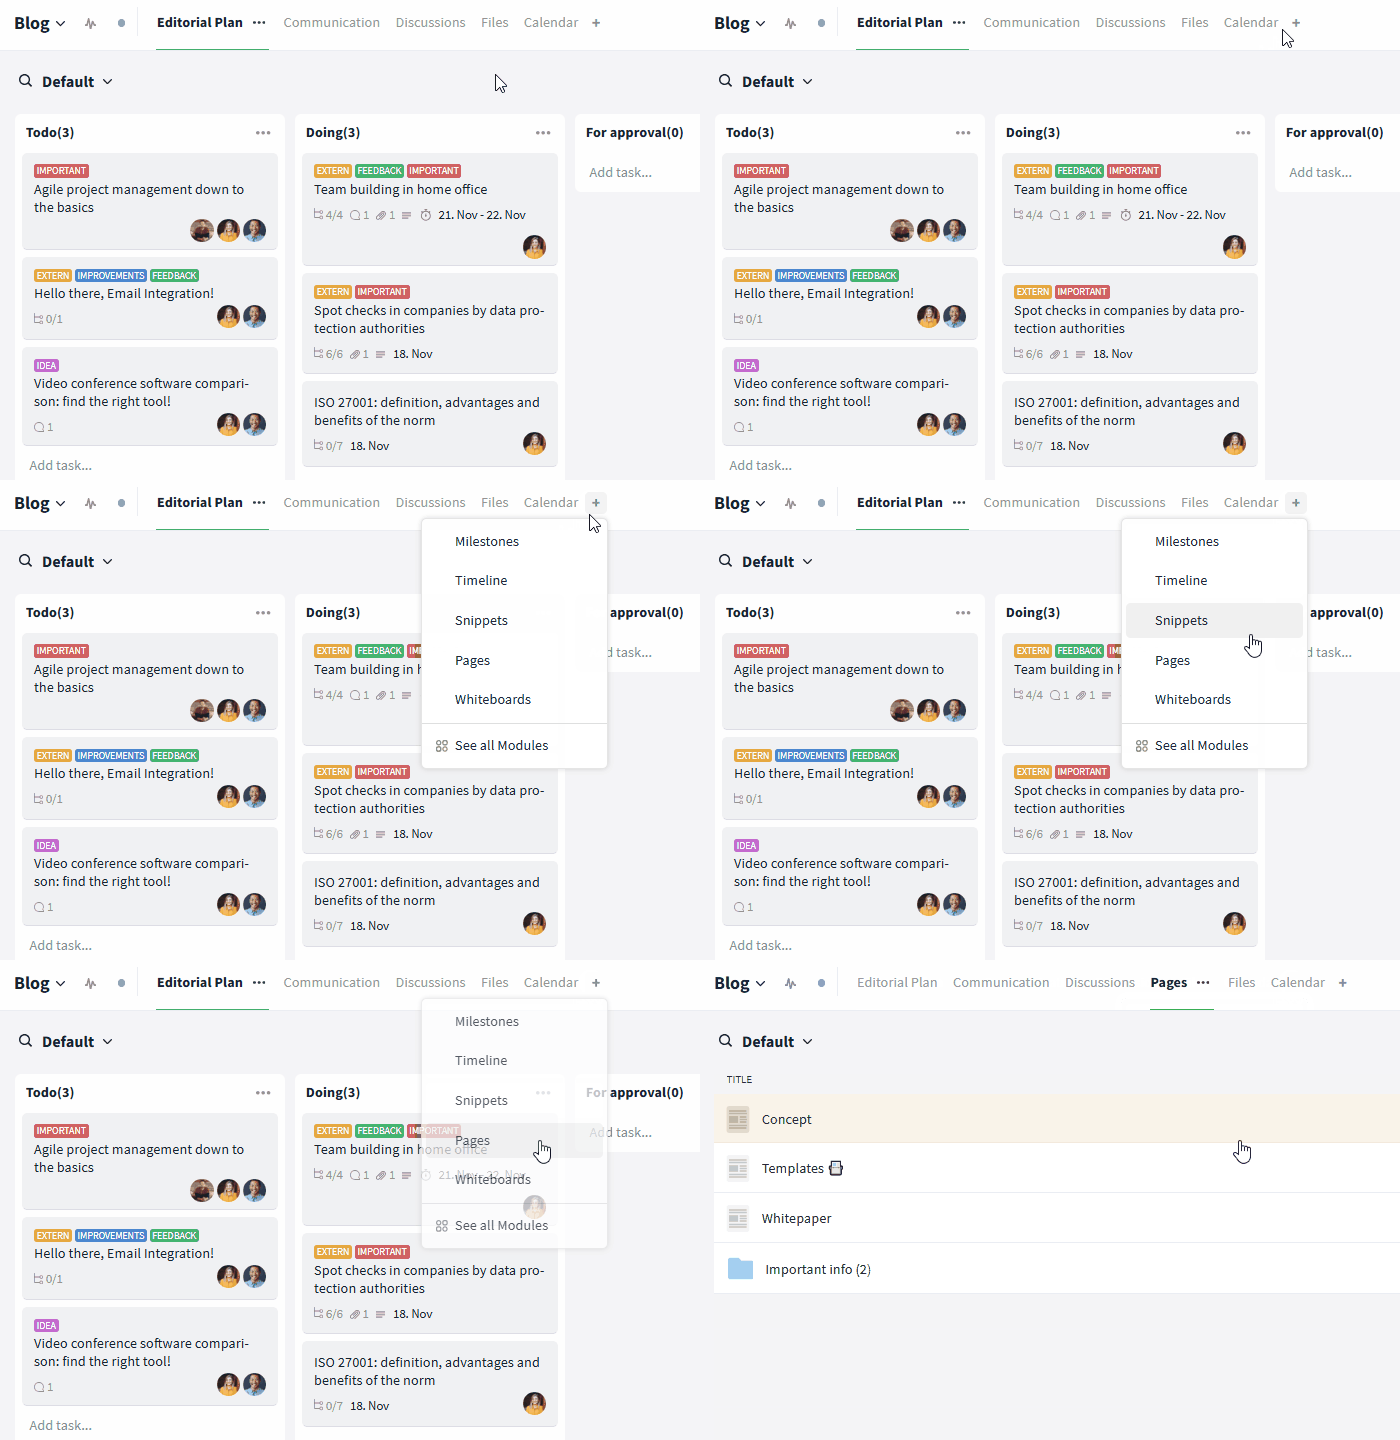
Enable modules via the small plus button
Manage the room via the cogwheel button
Another new icon can be found in the top right-hand corner of the room. Click on the cogwheel icon to display a range of options that allow you to manage, export, delete and move the room.
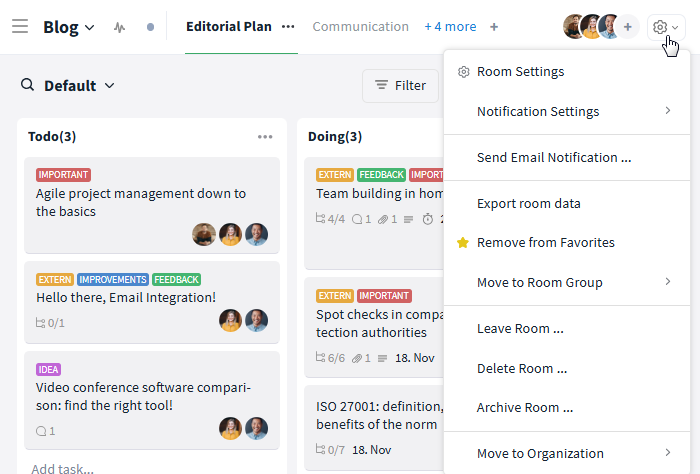
You can open the room settings and more via the cogwheel button
Formatting text messages (stream and comment area)
Communication is key – and sometimes the right formatting is worth a thousand words. We have now added several formatting options allowing you to format and structure your messages in the stream and comment area. To apply formatting, click on the “Aa” symbol on the right or select the desired text and choose the respective option. Whether it is bold, italic, underlined, strikethrough, as a code block or in list format - you decide.
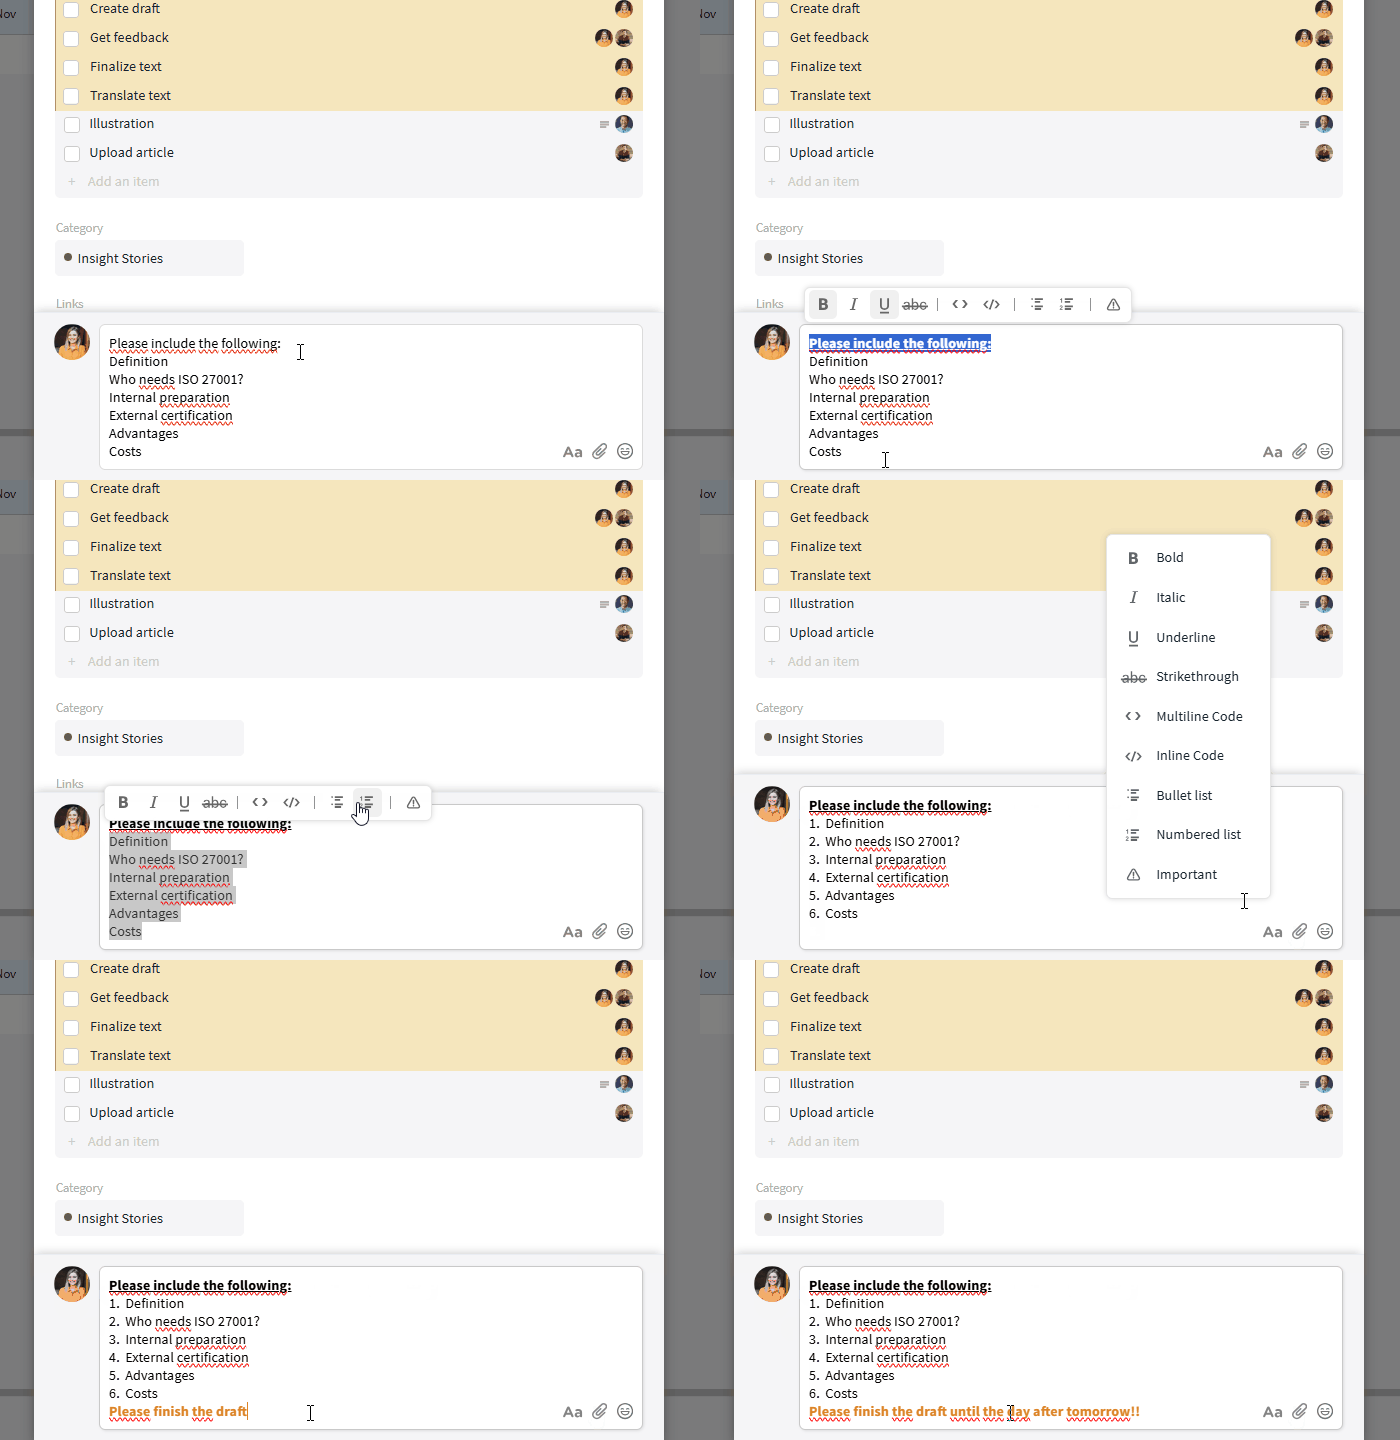
There are various formatting options available
Check availability for appointments: blocked events
As you may know, you can check the availability of potential participants for events (via “Check availability”). However, you were only shown events from rooms you yourself were included in. To give you a more comprehensive overview, Stackfield now also displays events from non-accessible rooms (from the same organization). For data protection reasons, the title remains hidden and is replaced with “Blocked”. This means you can still take your colleagues' schedules into account without having to access confidential details.
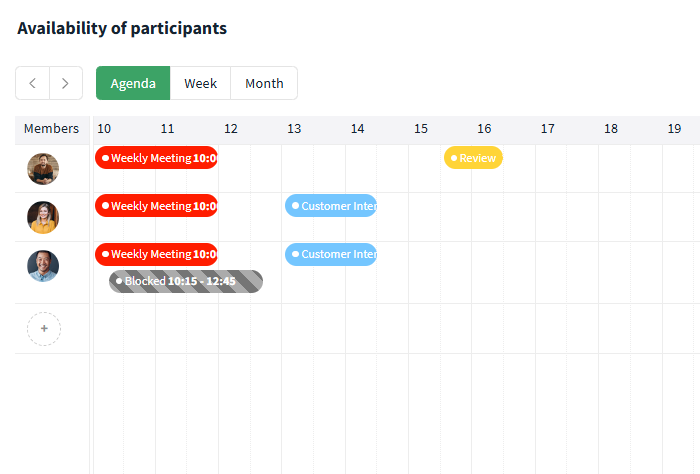
Events not available to you are blocked
Create rooms from CSV/Excel import
Good news for new Stackfield users and Excel fans: Switching to Stackfield is now easier than ever! If you have previously managed your tasks in another collaboration tool or in Excel and want to switch to Stackfield, you can do so without any detours. Simply export your task board from the previous tool, e.g. as a CSV file, and/or create a Stackfield room based on your Excel spreadsheet. Your tasks are then created directly in Stackfield and you can continue working immediately.
To create a room from an import, click on “+ Create New” at the top of Stackfield's sidebar as usual and select the option “New Room ...”. Now enter a name for your Stackfield room, activate end-to-end encryption if necessary and click on “Create from import...”.
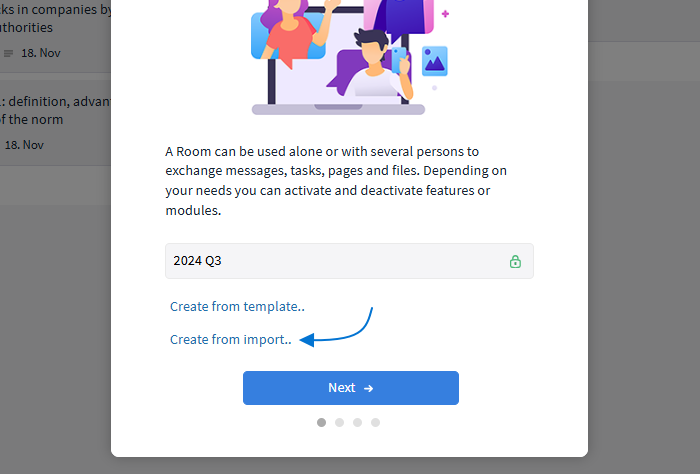
Import room data
Now drag the corresponding file into the field or click on “Upload data from file” and select the desired file. All files in .csv, .tsv, .xls, .xlsx and .txt format are accepted. Then click on “Next”.
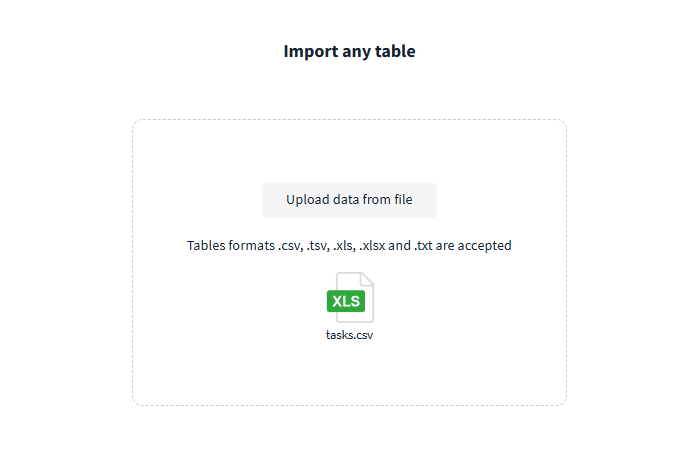
Upload a file
In the next tab, a preview of the table is displayed. Enable the slider next to “First row contains the column names” and adjust the delimiter type if necessary to ensure correct conversion. Then click on “Next”.
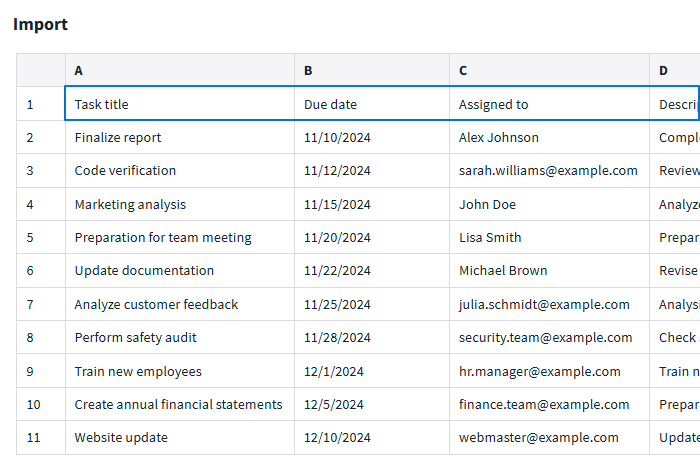
The first row contains the column names
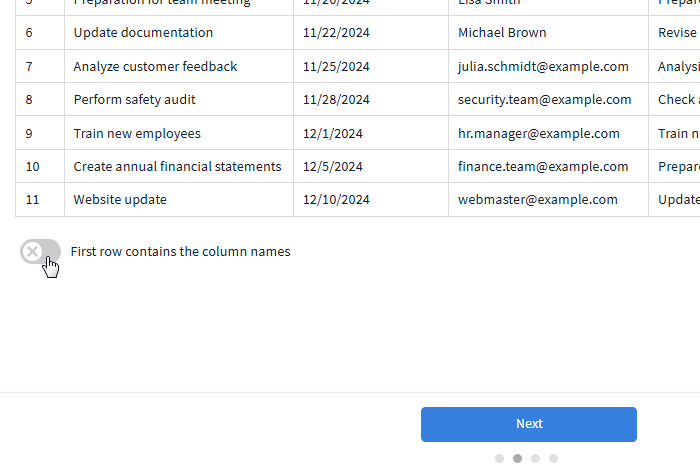
Enable the slider
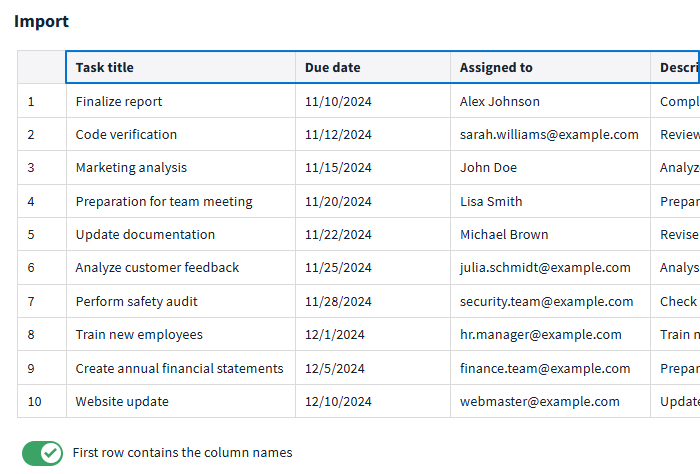
The table is adjusted
Now for each of the columns from your source file, you can decide whether the corresponding field should be transferred to Stackfield and, if so, which field type the column corresponds to. Select “Ignore column” to exclude the contents from Stackfield and select “Create custom field” if a field does not correspond to any of the predefined Stackfield fields. Finally, click on “Next”.

Decide which column corresponds to which stackfield field type
If your file contains an “Assignment” column and the corresponding people are stored with valid email addresses, you will be able to define their right groups in the next tab. These individuals will later be automatically invited via email or, if they already have a Stackfield account, added to the room with the specified right group. If you do not want a person to be added to the room or to be invited to Stackfield, select “Ignore invitation”. Then click on “Next”.
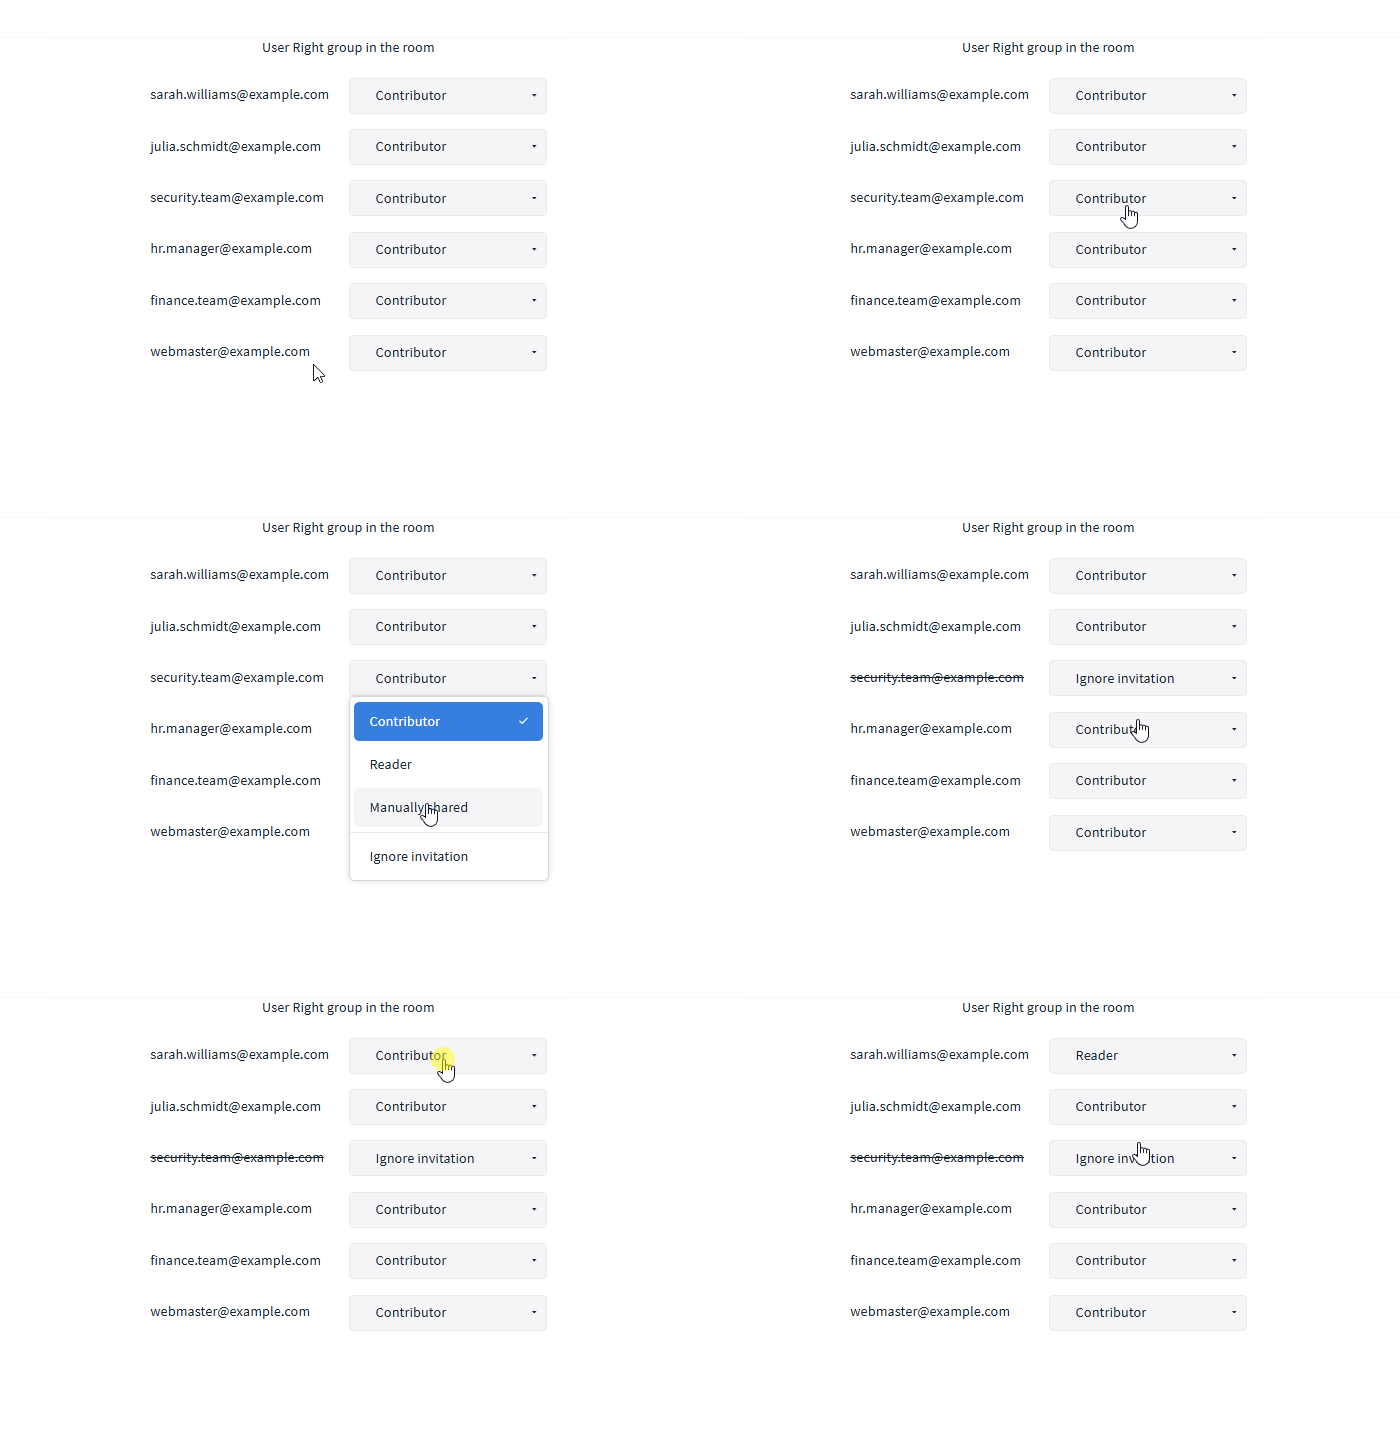
Decide which right group should be assigned to invited users
You will now be notified of conversion errors, if present. For example, if you have stored a personal name instead of an email address in the assignment column, the corresponding assignment cannot be created automatically in Stackfield. You can now either correct the corresponding conversion errors in the file and restart the process or click on “Confirm” and ignore the conversion errors. In this case, the corresponding data will not be stored in Stackfield.
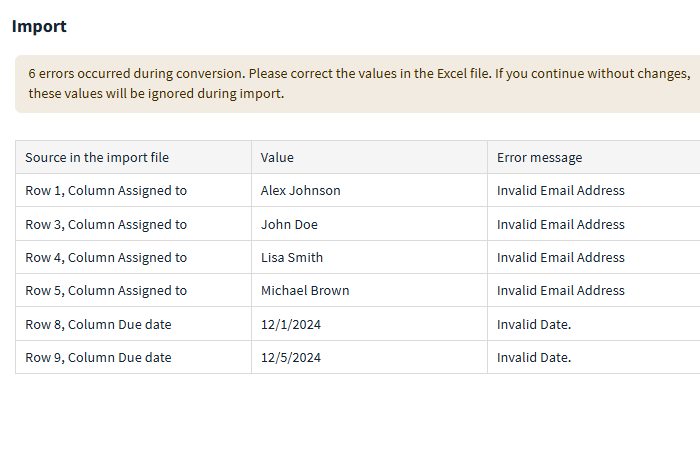
Correct conversion errors where necessary
The process is now complete. All tasks are added to the room with the corresponding information and the respective people are invited/added.
Comment PDF documents in Stackfield, fill out forms and more
Until now, the file preview in Stackfield has allowed you to view files directly in the platform without having to download and open them locally. Especially when working with PDF documents in Stackfield, there was an increasing demand for more functionality. We are now offering you more scope: PDFs can be commented directly in Stackfield and forms can be easily filled out directly in the tool. You also have the option of drawing in PDFs (e.g. to cross out or highlight passages) and inserting images.
To modify a PDF document in Stackfield, first open the PDF file, move the mouse over the preview and click on “Show entire file”. To annotate the document, click on the “T” symbol at the top right, select the color and font size and click on the position in the document where you want to insert the text input field. You can use the pencil icon and image icon to draw or insert images into the document.
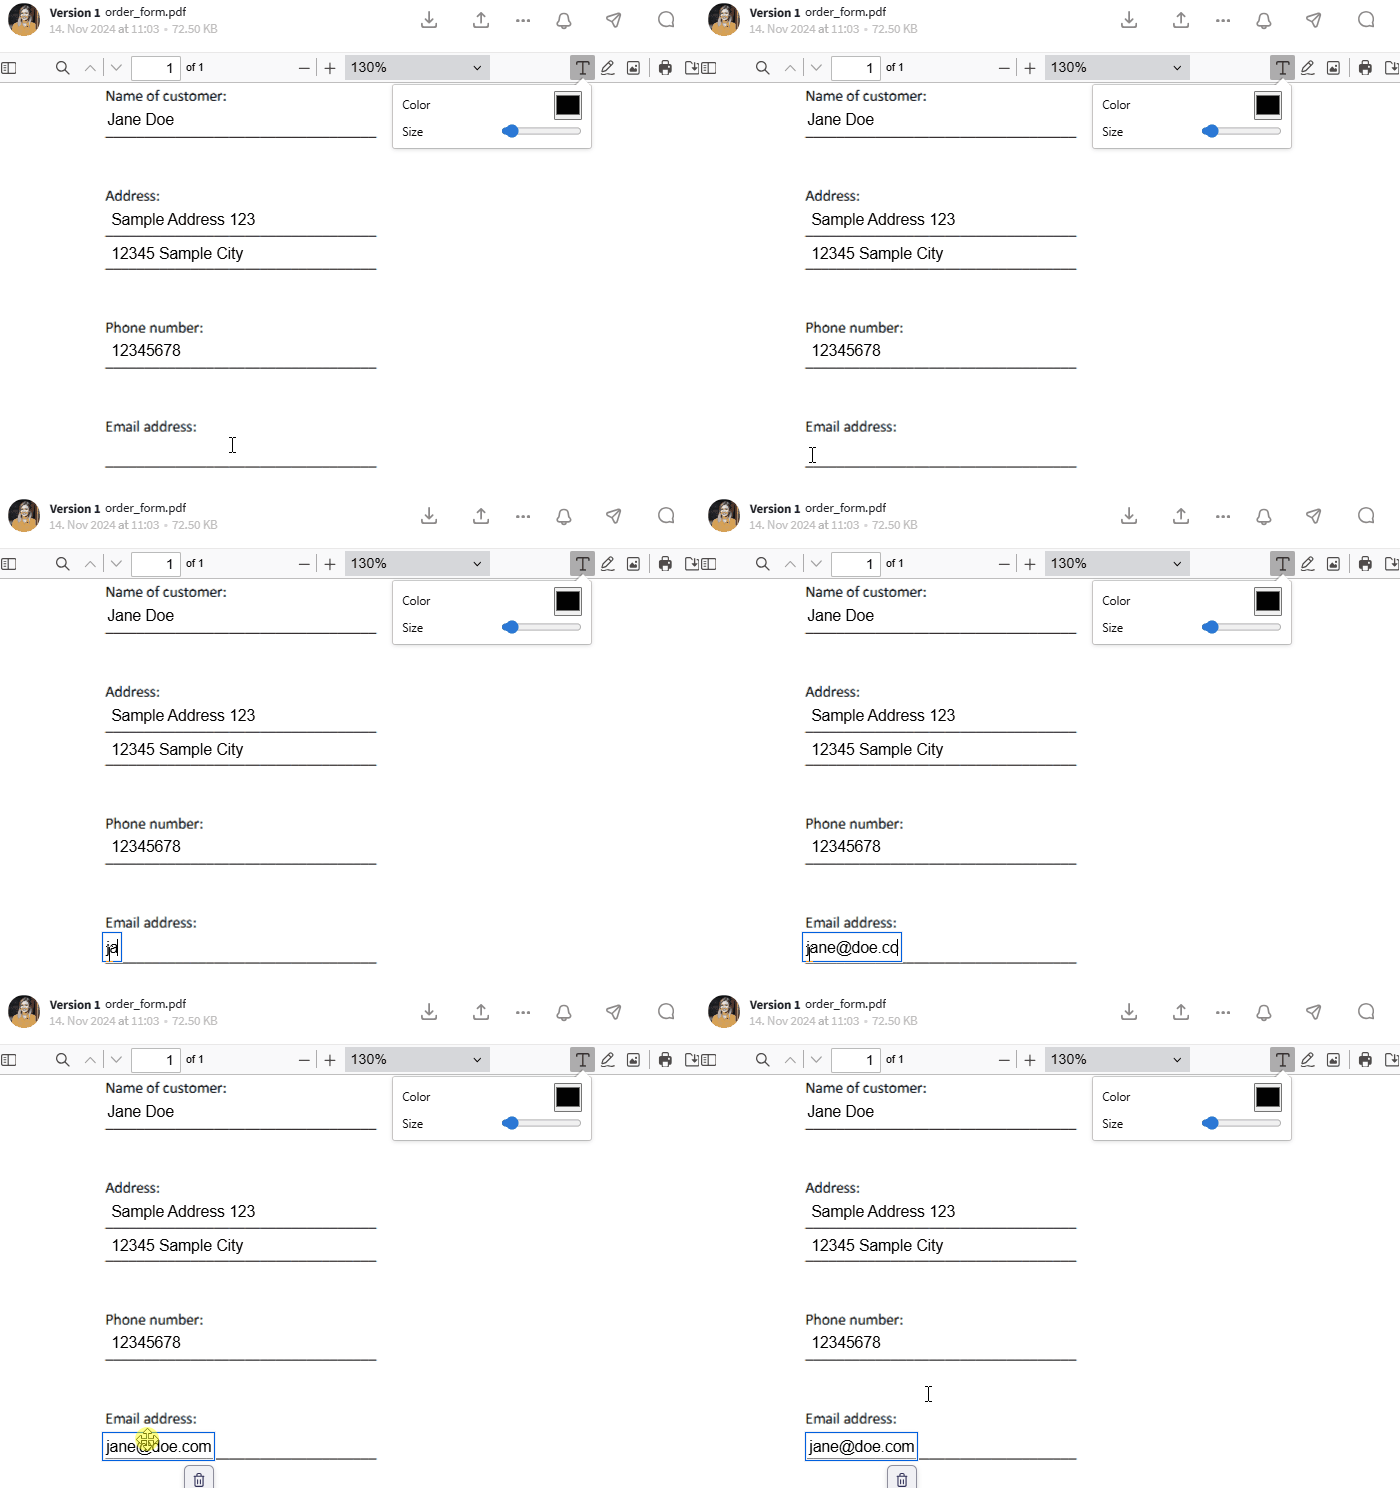
Fill out forms directly in Stackfield
As soon as you are finished with your edits, click on the save icon (“Save” on mouseover) at the top right. You can now decide whether the edited PDF should replace the old version in Stackfield (option “Yes”) or whether the edited PDF should only be saved locally (option “Save on my computer only”).
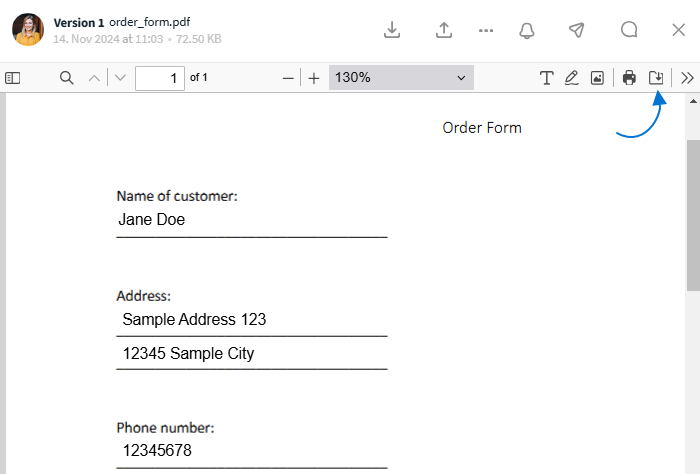
Save the PDF
Overwrite and customize the Auto Scheduling in the timeline
Auto Scheduling in the Gantt chart (timeline) helps you to manage changes to the timeline efficiently and ensures that potential bottlenecks are not overlooked. Until now, Auto Scheduling was predefined by default. Alternatively, you can now overwrite the Auto Scheduling and adapt it to your individual needs. This gives you full control over the scheduling of your projects.
To customize Auto Scheduling, open the room settings via the cogwheel icon at the top right and switch to the module tab. Now click on “Settings” under “Timeline” and enable the switch next to “Custom Settings”.
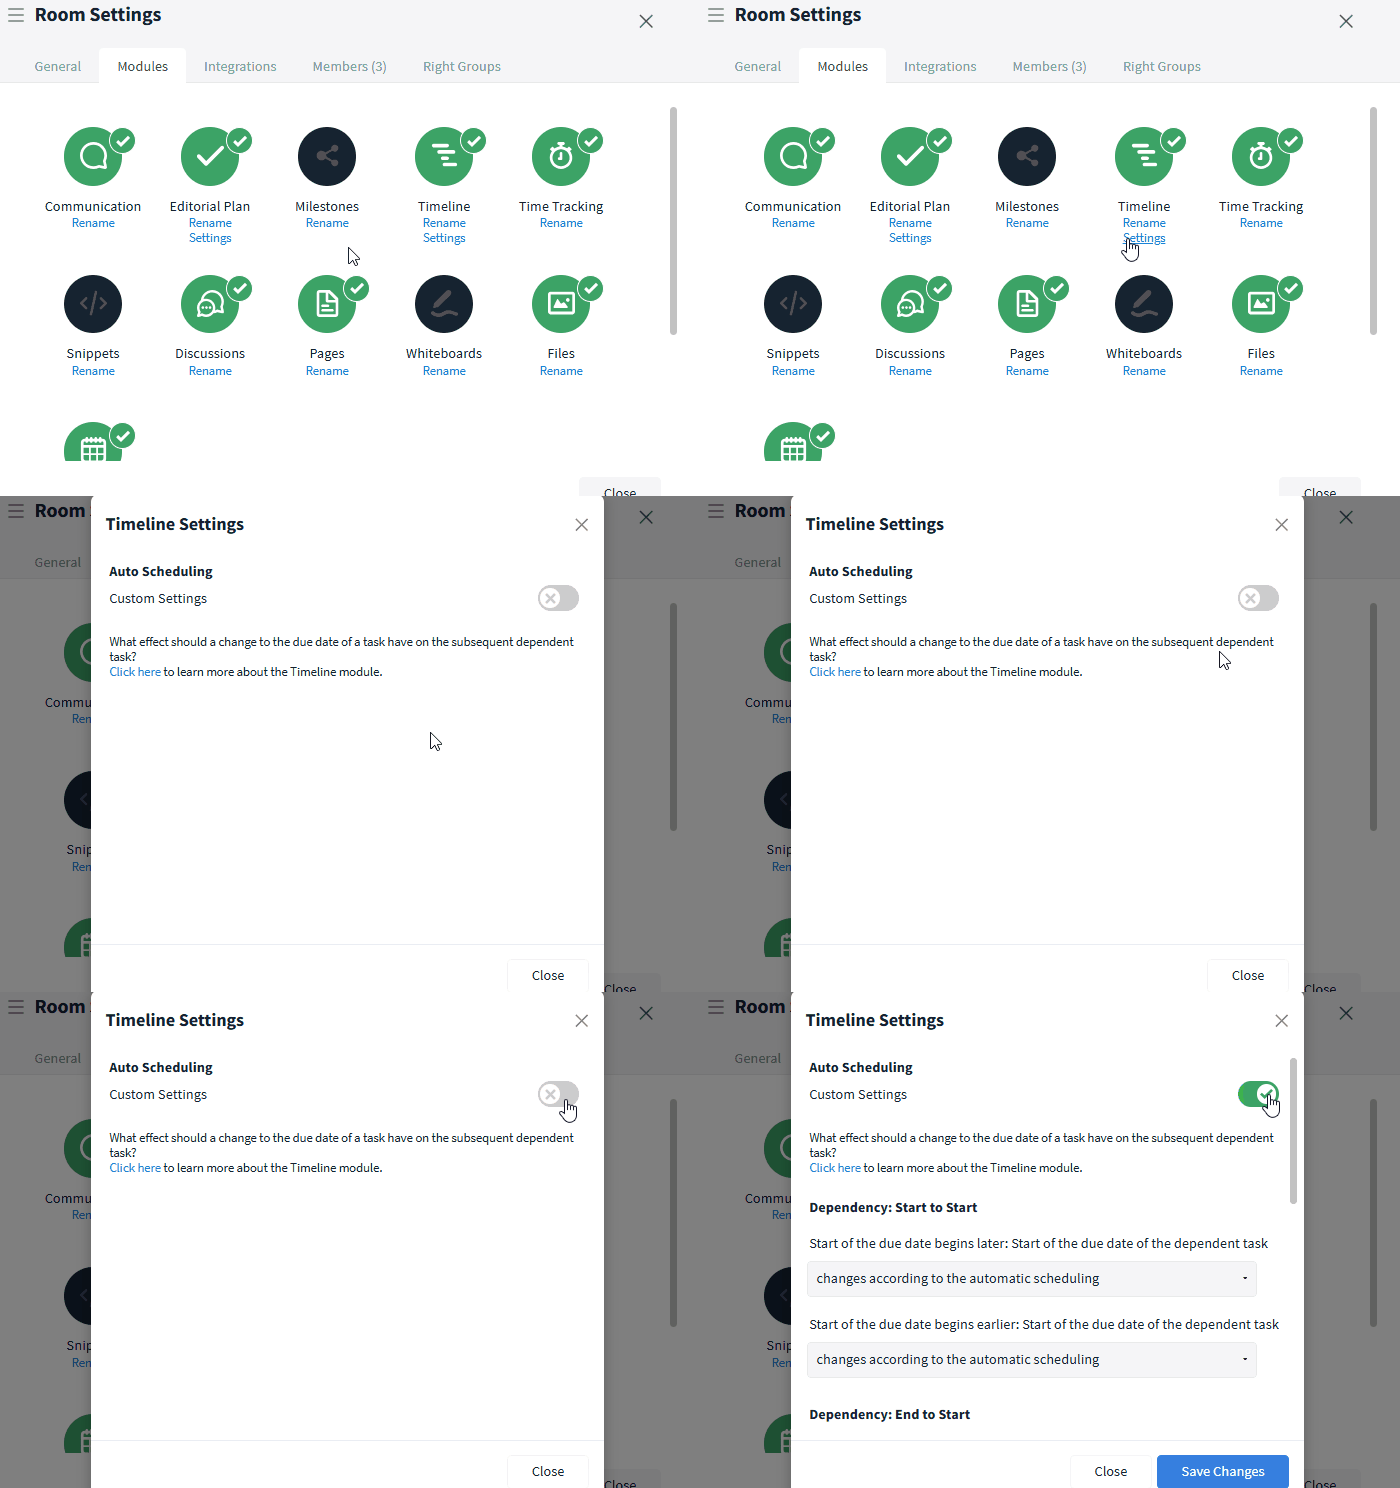
Enable custom settings for Auto Scheduling
Finally adjust all settings according to your wishes and click on “Save Changes”. Auto Scheduling is now applied according to your defined rules.
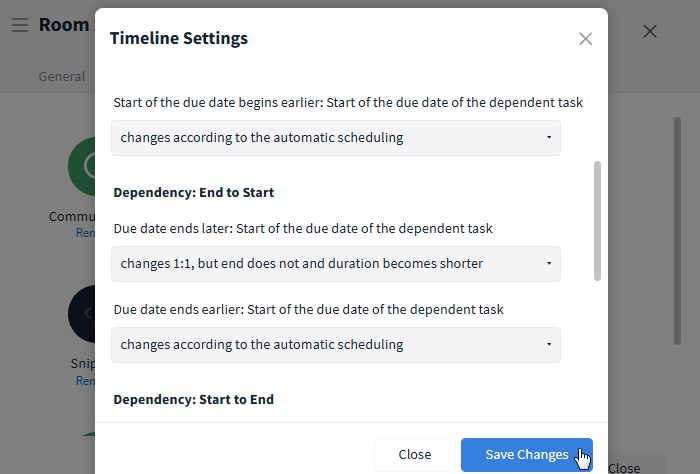
Save your newly defined rules
Advanced settings for your organization
As an organization admin, you have the option of defining numerous permissions in the organization settings. Previously, a distinction was mainly made between admins and members. To define even more precisely who can perform which actions, you can now assign permissions to teams.
First open your organization's settings and switch to the permissions tab. The new option is available in the sections “Rooms”, “Room Groups” and “Adding new persons”. Now select the option “Admins & Team” or “Team” from the drop-down list to the right of the corresponding action, for example “Who can create rooms?”. You can then select the desired team using the new dropdown underneath.
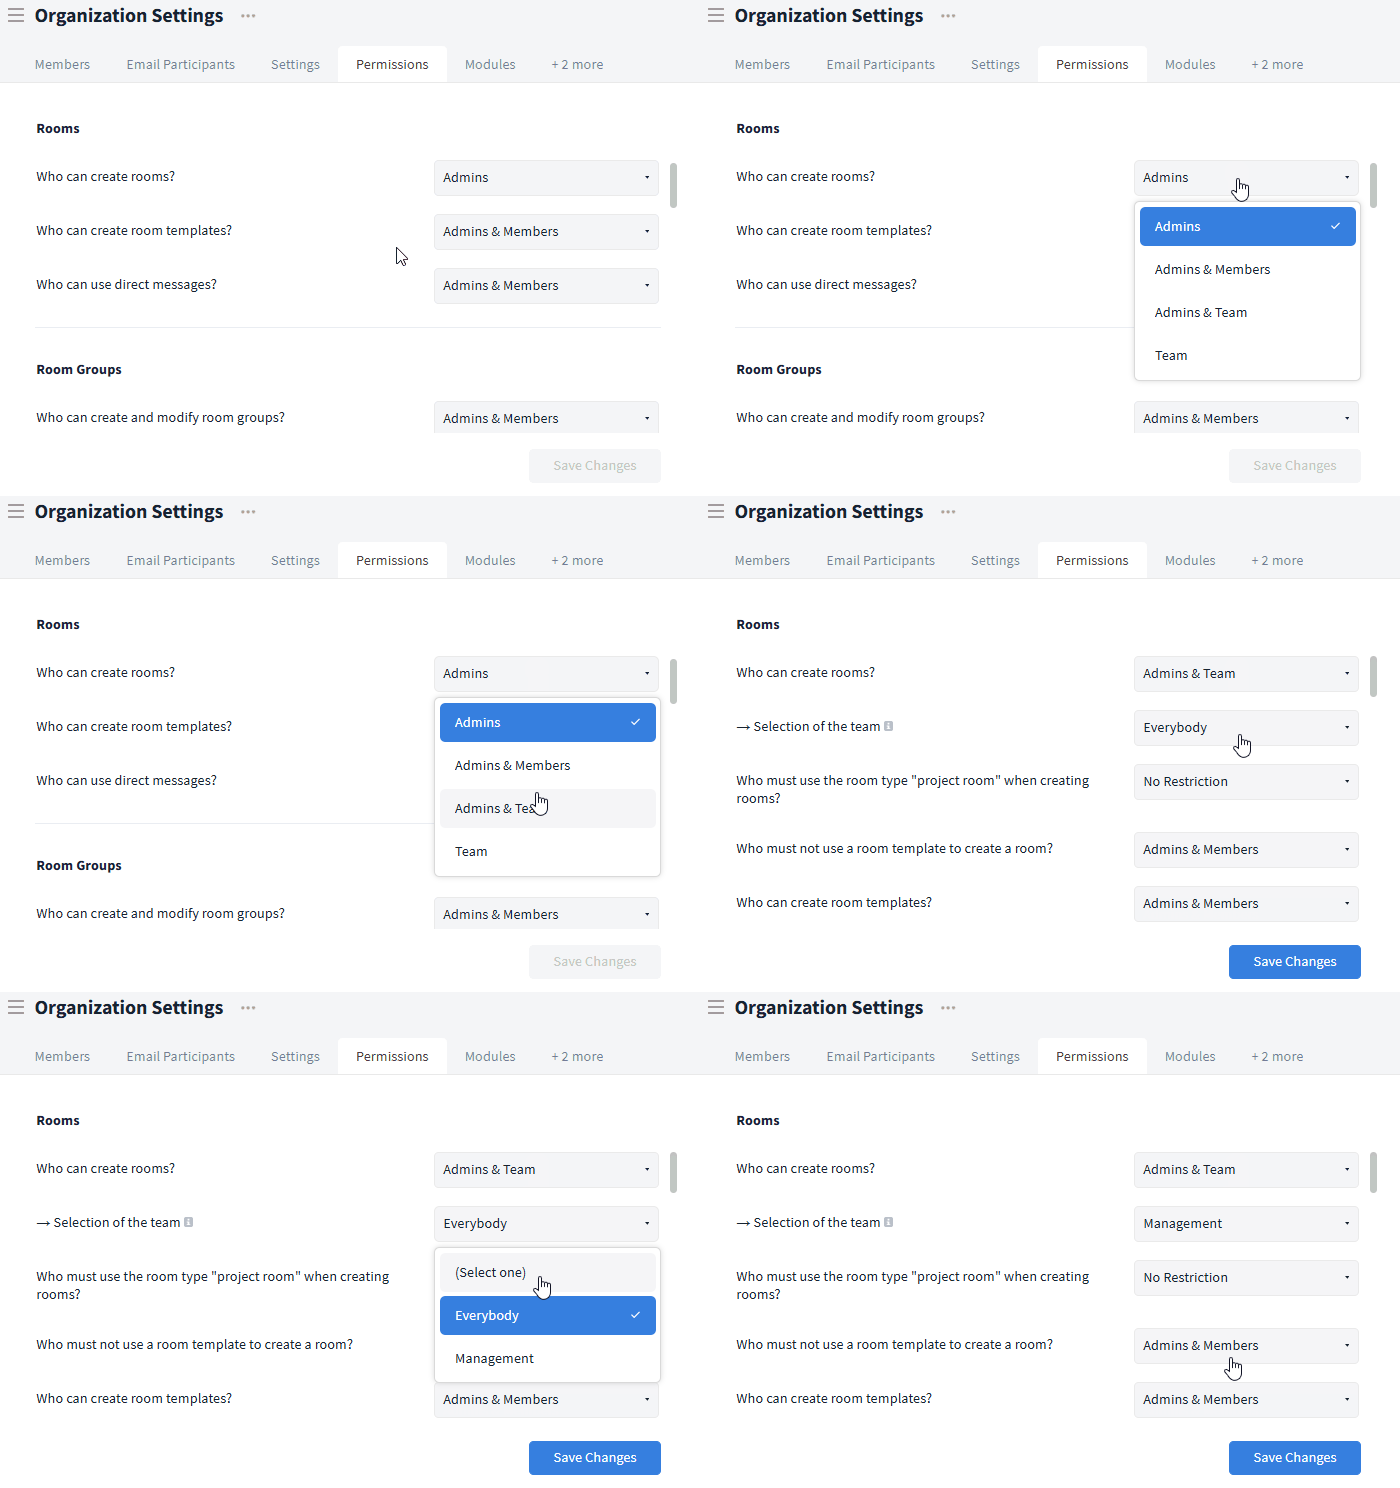
Use teams to assign permissions
If you haven't defined any teams yet, click here to learn how to create new teams in Stackfield.
Another little bonus: In the section “Adding new persons”, a distinction is now made between adding members, guests and externals.
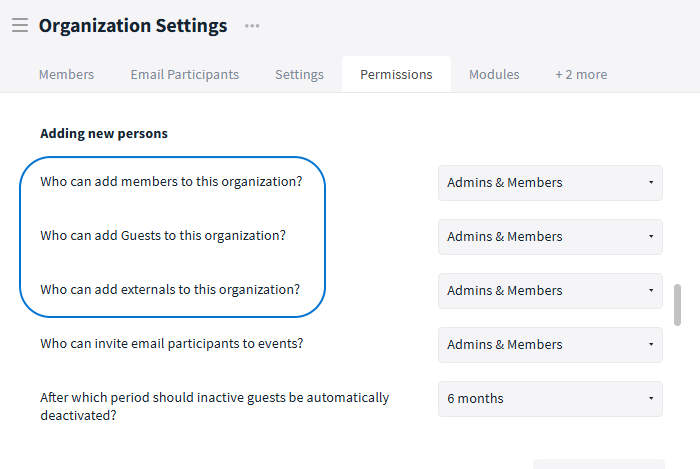
Differentiate between different user roles
WebHooks and email integration for encrypted rooms
With webhooks and email integration, work processes in Stackfield can be automated efficiently. Completed forms from your website, emails and other relevant information can be sent directly to Stackfield and created there as, for example, a task. Until now, however, this function was only available in unencrypted rooms.
We have now expanded the automation options: From now on, you can also use webhooks and email integration in end-to-end encrypted rooms. This allows you to benefit from automated workflows without having to compromise on the protection of sensitive data.
Deleting rooms as an organization admin
Until now, admins of an organization could access an overview of all rooms including their settings, but did not have the option to delete inactive rooms. However, in certain cases, such as when employees leave the company, it can be useful and necessary to have the appropriate rights. For this reason, we have decided to add this possibility for organization admins. To prevent accidental deletion, organization admins can only delete a room if the recycle bin is activated.
To delete an inactive room, first open the settings of your organization and switch to the statistics tab. Then click on “(E2E-encrypted) Rooms & Group Chats”.
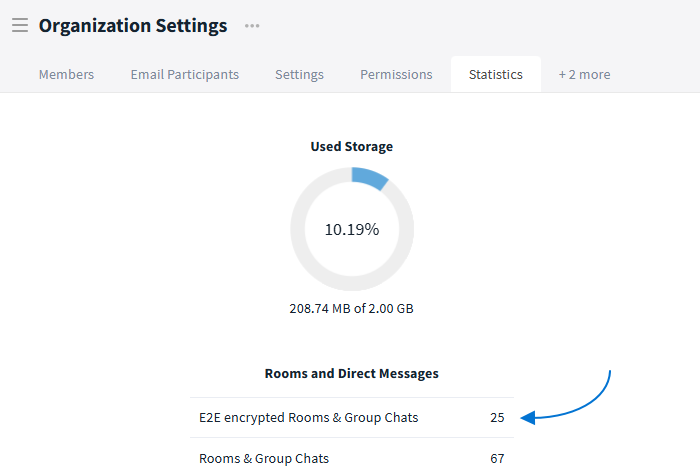
You can find a list of all rooms in the statistics
Use the search function at the top to search for a specific room. Then click on “Settings” to the right of the desired room to display its settings.
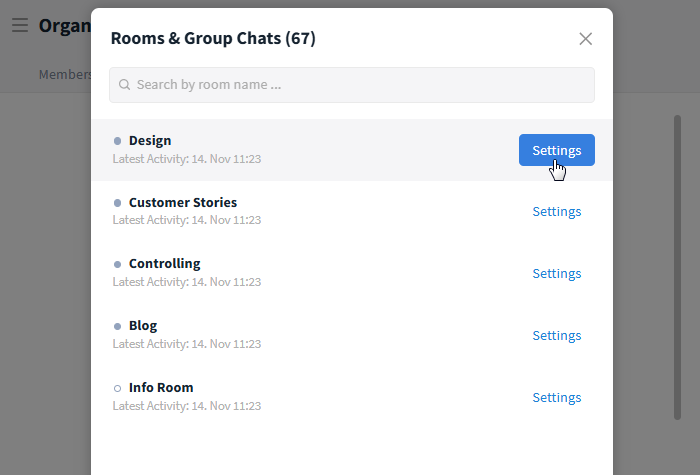
You can open any room's settings as an organization admin
If desired, switch to the members tab to check the room for inactive members.
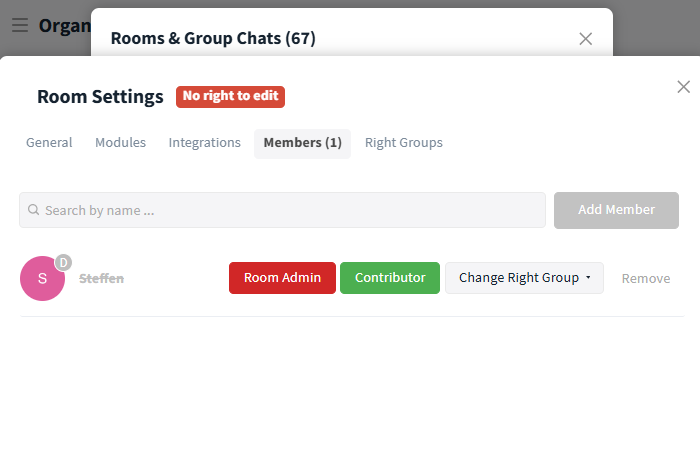
The room admin is no longer part of the organization
To delete the room, click on the red button labeled “Delete Room” at the bottom left and confirm the deletion process as usual. You have 30 days after deletion to restore the room if required.
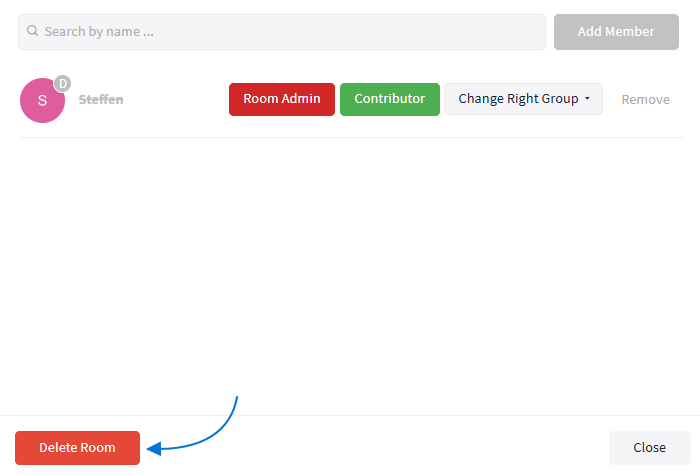
Delete the room
Export room data in csv and xlsx format
Using the cogwheel icon in the top right-hand corner and the “Export room data” option, it has been possible to export room activities and entries in PDF format. In the drop-down list under “FileType”, you can now alternatively select an Excel (xlsx) export and a CSV export.
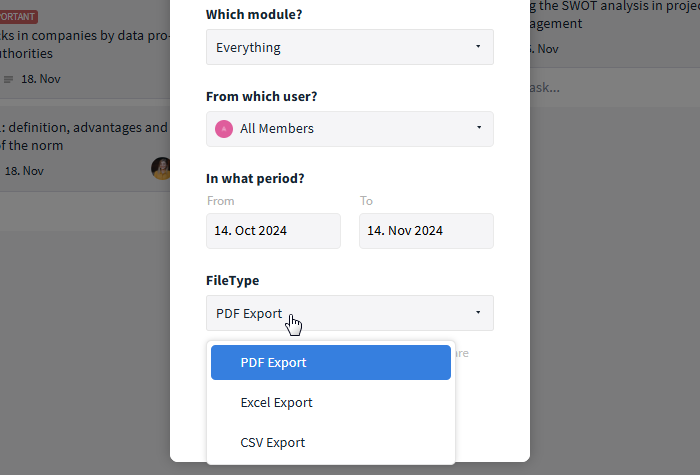
Switch between different types of room export
Display and export dependencies between tasks in the list view
If dependencies between tasks are defined in your room, you can now add them as columns to the list view (task module) and include them in an export.
To do so, open the task module, switch to the list view and click on “MORE” in the top right-hand corner. Now check the box next to the “Dependencies” option to show the corresponding column.
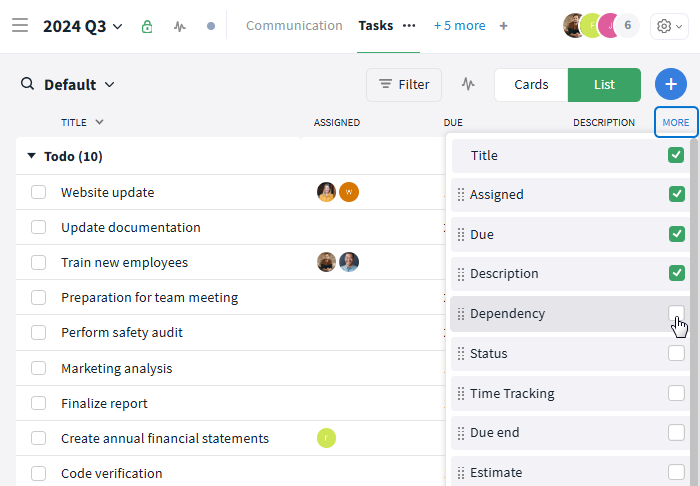
Show dependencies via “MORE” button
Alternatively, you can customize the columns in the upper area of the filter (“Filter” button) below “Columns”. To export the view, click on “Print and Export” in the bottom area of the filter.
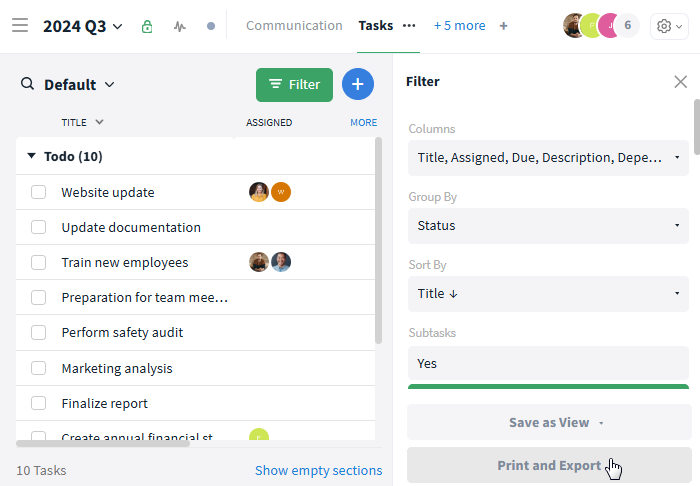
Export the view via the filter
Filter by labels in the Gantt chart
Up until now, you could filter task packages in the Gantt chart (timeline) by year, status and assignment. In addition, you can now filter by labels. This way, you can display higher-priority tasks with labels such as “Important” to keep an eye on urgent tasks, or filter by labels such as “Marketing” to display the planning of individual departments more clearly.
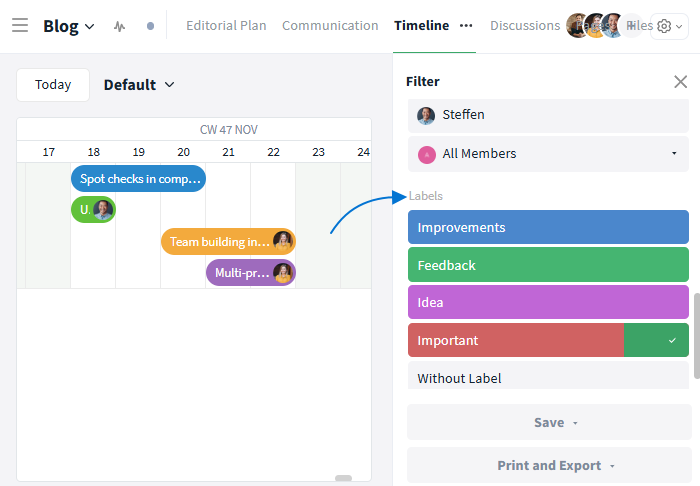
Filter by labels in the timeline
Define right groups for room templates
Room templates are ideal for simplifying and speeding up recurring processes. To predefine which people should be part of a room based on a template, users can be added to room templates. In addition, you can now define right groups for the respective users and specify which privileges they should have within the room in advance. The procedure is the same as for normal rooms.
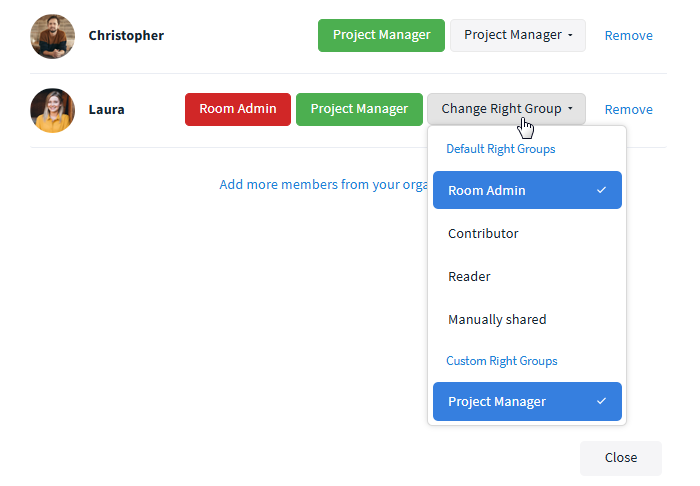
Define right groups in templates
Edit custom fields across rooms in the reports
In the reports, tasks from different rooms can be displayed in one view and edited together via selection. For example, it was previously possible to change the status, assignment or due date of various tasks in one go. Now multi-edit is also possible for custom fields. If the same custom field has been defined in different rooms, you can also edit the fields across rooms.
This is how it works: Select the relevant tasks by holding down the Ctrl key and clicking on the tasks. Next, right-click and select the desired option to edit the respective (custom) field for all selected tasks.
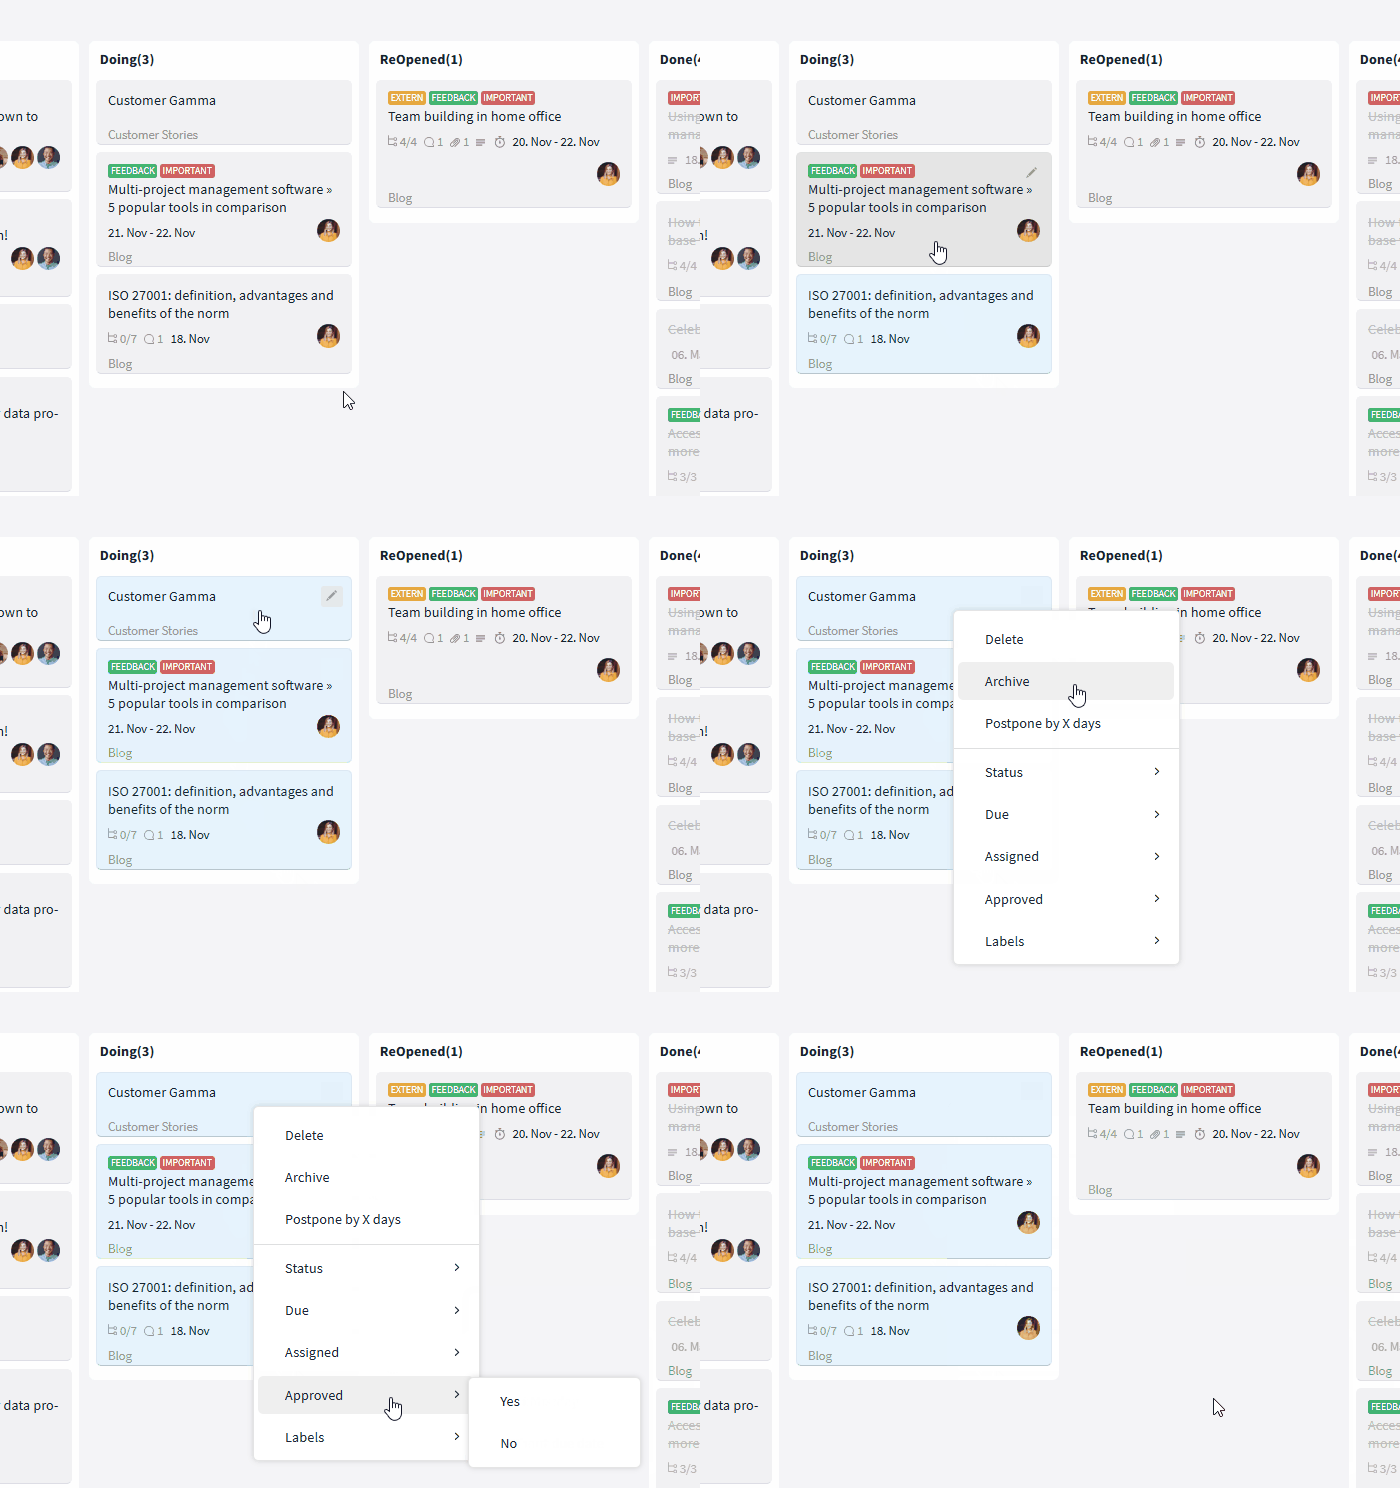
Edit multiple tasks in one go